<?xml version="1.0" encoding="utf-8"?><feed xmlns="http://www.w3.org/2005/Atom" ><generator uri="https://jekyllrb.com/" version="4.3.3">Jekyll</generator><link href="https://osomac.com/feed.xml" rel="self" type="application/atom+xml" /><link href="https://osomac.com/" rel="alternate" type="text/html" /><updated>2026-01-01T00:36:03+00:00</updated><id>https://osomac.com/feed.xml</id><title type="html">OSOMac, Cesare Tagliaferri’s blog</title><subtitle>I created this site to talk about the applications I used to write. That part of my life is temporarily on pause, but the site lives mainly as my blog.</subtitle><author><name>Cesare Tagliaferri</name></author><entry><title type="html">Ensuring Your Synology NAS Encryption Keys are Valid on DSM 7.2</title><link href="https://osomac.com/2024/08/24/ensuring-your-synology-nas-encryption-keys-are-valid/" rel="alternate" type="text/html" title="Ensuring Your Synology NAS Encryption Keys are Valid on DSM 7.2" /><published>2024-08-24T00:00:00+00:00</published><updated>2024-08-24T00:00:00+00:00</updated><id>https://osomac.com/2024/08/24/ensuring-your-synology-nas-encryption-keys-are-valid</id><content type="html" xml:base="https://osomac.com/2024/08/24/ensuring-your-synology-nas-encryption-keys-are-valid/"><![CDATA[<p>I have been using encrypted volumes on my Synology NAS since they were introduced in DSM 7.2. Despite understanding the limitations and security risks, I decided to adopt them early on, with the intention of eventually moving the keys to an external KMIP server when I have the time.</p>

<p>One feature that I felt was missing from the “encrypted volumes” implementation was the ability to verify the validity of the encryption keys. After spending some time figuring out how to do this, I decided to document the process to help others who might be facing the same challenge.</p>

<h3 id="key-validity-check">Key Validity Check</h3>
<p>To verify the validity of an encryption key, follow these steps:</p>

<ol>
  <li><strong>Create a Temporary Encrypted Shared Folder</strong>: This folder will be deleted after the verification process to ensure no encryption keys remain accessible on the NAS.</li>
  <li><strong>Upload the Encryption Keys</strong>: Place the <code class="language-plaintext highlighter-rouge">.rkey</code> files in the new shared folder.</li>
  <li><strong>Connect to the NAS via SSH</strong>: Navigate (<code class="language-plaintext highlighter-rouge">cd</code>) to the shared folder.</li>
  <li><strong>Decode the Key Files</strong>: The key files are base64 encoded. Use the following command to decode them:
    <div class="language-sh highlighter-rouge"><div class="highlight"><pre class="highlight"><code> find <span class="nb">.</span> <span class="nt">-name</span> <span class="s2">"*.rkey"</span> <span class="nt">-exec</span> sh <span class="nt">-c</span> <span class="s1">'base64 --decode "$1" &gt; "${1%.*}_decoded.rkey"'</span> sh <span class="o">{}</span> <span class="se">\;</span>
</code></pre></div>    </div>
  </li>
  <li><strong>Check the Validity of Each Key</strong>: Use this command to verify each key:
    <div class="language-sh highlighter-rouge"><div class="highlight"><pre class="highlight"><code> <span class="nb">sudo </span>cryptsetup open <span class="nt">--test-passphrase</span> /dev/vgX/volume_X <span class="nt">-S</span> 1 <span class="nt">-d</span> /volumeY/temp_key_check/XXXX_VolumeX_decoded.rkey <span class="nt">-v</span>
</code></pre></div>    </div>
    <p>Where <code class="language-plaintext highlighter-rouge">X</code> is the volume number of the volume you need to check, and <code class="language-plaintext highlighter-rouge">volumeY/temp_key_check/XXXX_VolumeX_decoded.rkey</code> is the path to the decoded key. Synology stores the encryption key in slot 1, this is why we specify <code class="language-plaintext highlighter-rouge">-S 1</code> (this is not strictly necessary, without this argument the command would check all slots, if I’m not mistaken).</p>

    <ul>
      <li>If the key is valid, you will see this in the command output: <code class="language-plaintext highlighter-rouge">Key slot 1 unlocked.</code></li>
      <li>If the key is incorrect, you will see this instead: <code class="language-plaintext highlighter-rouge">No key available with this passphrase.</code></li>
    </ul>

    <p>In both cases, you will see <code class="language-plaintext highlighter-rouge">No usable token is available</code> in the output: this is normal.</p>

    <p><strong>IMPORTANT</strong>: This command is non-destructive, and it can safely be used on a mounted volume.</p>
  </li>
</ol>

<p>I perform this check quarterly to ensure that I can access my files, even if I need to reset the NAS or move the HDDs to a different unit.</p>]]></content><author><name>Cesare Tagliaferri</name></author><category term="Tutorials" /><category term="storage" /><category term="nas" /><category term="encryption" /><category term="security" /><category term="tutorials" /><summary type="html"><![CDATA[In this post, I explain how to verify the validity of encryption keys on a Synology NAS with DSM 7.2. Since using encrypted volumes, I found it challenging to check if the keys were still valid. Here, I share a straightforward method to ensure your keys are reliable, helping you maintain access to your data even if you need to reset the NAS or move the HDDs.]]></summary><media:thumbnail xmlns:media="http://search.yahoo.com/mrss/" url="https://osomac.com/assets/img/osomac-image.jpg" /><media:content medium="image" url="https://osomac.com/assets/img/osomac-image.jpg" xmlns:media="http://search.yahoo.com/mrss/" /></entry><entry><title type="html">Running tmux on a Synology NAS</title><link href="https://osomac.com/2022/12/07/running-tmux-on-synology-nas/" rel="alternate" type="text/html" title="Running tmux on a Synology NAS" /><published>2022-12-07T00:00:00+00:00</published><updated>2022-12-07T00:00:00+00:00</updated><id>https://osomac.com/2022/12/07/running-tmux-on-synology-nas</id><content type="html" xml:base="https://osomac.com/2022/12/07/running-tmux-on-synology-nas/"><![CDATA[<p>This is a short tutorial on how to use tmux on a NAS, without installing any unofficial package. I am using this on a Synology NAS running <a href="https://www.synology.com/en-us/dsm">DSM 7.1</a>—the current version at the time of this writing—but the same technique will work on any device which supports Docker.</p>

<p>Before starting, I must say that tmux is available from <a href="https://synocommunity.com">SynoCommunity</a>, in a package called “SynoCli Network Tools”. SynoCommunity is a reputable and trustworthy source, but I decided not to install any unofficial package on my Synology, since I want absolute stability.</p>

<h2 id="the-problem">The Problem</h2>

<p>Modern NAS devices pack considerable computing power, and can have a very decent amount of RAM: they can do much more than storage. I often need to do analysis on big volumes of data, and I prefer to avoid doing it on my laptop (limited storage, heat, etc.). I can connect to the NAS with SSH but, having to rely solely on <code class="language-plaintext highlighter-rouge">nohup</code> for long processes, can be pretty limiting. To give you an example, a couple of weeks ago I wanted to move a 5 TB folder to a <a href="https://github.com/minio/minio">MinIO server</a>: the simplest way I could find was to use <a href="https://min.io/docs/minio/linux/reference/minio-mc.html">MinIO Client</a> (with the <code class="language-plaintext highlighter-rouge">mc cp</code> command). I was going to run the <code class="language-plaintext highlighter-rouge">mc cp</code> command from a <a href="https://hub.docker.com/r/minio/mc/">MinIO Client container</a>, to move data from a shared folder on the NAS to a <a href="https://hub.docker.com/r/minio/minio">MinIO Server container</a>.</p>

<p>Since I knew that the process would have taken a couple of days at least, I wanted to avoid having to keep a terminal open and rely on a stable network connection for all that time. I could have possibly run something like <code class="language-plaintext highlighter-rouge">nohup mc cp</code> on the client container, but I am uncertain if that is even possible, and I preferred to keep the process running in a shell.</p>

<h2 id="the-solution">The Solution</h2>

<p>My solution is simple: I used a third container—based a basic <a href="https://hub.docker.com/_/alpine/">alpine image</a>—with the addition of tmux and OpenSSH. The idea is to run tmux inside the container, and ssh back to the host. I am no Docker expert, but this is the Dockerfile I used:</p>

<div class="language-dockerfile highlighter-rouge"><div class="highlight"><pre class="highlight"><code><span class="k">FROM</span><span class="s"> alpine:latest</span>
<span class="k">RUN </span>apk add openssh
<span class="k">RUN </span>apk add tmux
<span class="c"># The following command is just to keep the container alive once started</span>
<span class="k">CMD</span><span class="s"> tail -f /dev/null</span>
</code></pre></div></div>

<p>From the directory containing the Dockerfile, I just did the following:</p>

<ol>
  <li>Build the image: <code class="language-plaintext highlighter-rouge">docker build -t alpine_tmux .</code></li>
  <li>Start a container based on the new image: <code class="language-plaintext highlighter-rouge">docker run -d --rm --name tmux alpine_tmux:latest</code></li>
  <li>Start a shell: <code class="language-plaintext highlighter-rouge">docker exec -it tmux sh</code></li>
  <li>SSH into the host: <code class="language-plaintext highlighter-rouge">ssh your_username@$(/sbin/ip route|awk '/default/ { print $3 }')</code><sup id="fnref:1" role="doc-noteref"><a href="#fn:1" class="footnote" rel="footnote">1</a></sup></li>
</ol>

<p>If you want to avoid building the image, I have published the one I use (please note that I have added a couple of other tools) to it. The image is on <a href="https://hub.docker.com/repository/docker/tagliasteel/tmux_ssh">Docker hub</a>, if you want to use it, you can skip point 1, and replace the command at point 2 with: <code class="language-plaintext highlighter-rouge">docker run -d --rm --name tmux tagliasteel/tmux_ssh</code>.</p>

<p>Once the work is done, I just stop the container with <code class="language-plaintext highlighter-rouge">docker stop tmux</code>, and docker cleans everything up (since the container was created with the <code class="language-plaintext highlighter-rouge">--rm</code> option).</p>

<h2 id="final-thoughts">Final Thoughts</h2>

<p>When I don’t need to run commands on other containers, I prefer to just map the volumes I need (adding <code class="language-plaintext highlighter-rouge">-v</code> to the <code class="language-plaintext highlighter-rouge">docker run</code> command above), and install everything I need inside the container. I like the alpine image because it’s extremely minimalistic, of course I would choose a more appropriate image if I needed to do something very specific.</p>

<p>Nothing here is particularly complex but, as a docker newbie, it took me a while to come up with this solution. I hope it will be useful to others facing the same issue.</p>

<div class="footnotes" role="doc-endnotes">
  <ol>
    <li id="fn:1" role="doc-endnote">
      <p>The <code class="language-plaintext highlighter-rouge">/sbin/ip route|awk '/default/ { print $3 }'</code> command simply outputs the IP address of the host. <a href="#fnref:1" class="reversefootnote" role="doc-backlink">&#8617;</a></p>
    </li>
  </ol>
</div>]]></content><author><name>Cesare Tagliaferri</name></author><category term="Tutorials" /><category term="storage" /><category term="nas" /><category term="tutorials" /><summary type="html"><![CDATA[How to run tmux on a Synology NAS, using only Docker and without installing any unofficial package.]]></summary><media:thumbnail xmlns:media="http://search.yahoo.com/mrss/" url="https://osomac.com/assets/img/osomac-image.jpg" /><media:content medium="image" url="https://osomac.com/assets/img/osomac-image.jpg" xmlns:media="http://search.yahoo.com/mrss/" /></entry><entry><title type="html">Minting myself into an NFT</title><link href="https://osomac.com/2022/07/17/minting-myself-into-nft-for-twitter/" rel="alternate" type="text/html" title="Minting myself into an NFT" /><published>2022-07-17T00:00:00+00:00</published><updated>2022-07-17T00:00:00+00:00</updated><id>https://osomac.com/2022/07/17/minting-myself-into-nft-for-twitter</id><content type="html" xml:base="https://osomac.com/2022/07/17/minting-myself-into-nft-for-twitter/"><![CDATA[<p>The idea behind this post came to me from Twitter’s initiative, allowing users to <a href="https://twitter.com/popbase/status/1505171798706601985">set an NFT as profile picture</a> (please note that, at the time of this writing, you need to subscribe to <a href="https://help.twitter.com/en/using-twitter/twitter-blue">Twitter Blue</a> for this). Unfortunately, I arrived into the <a href="https://en.wikipedia.org/wiki/Non-fungible_token">NFT</a> world late, and I do not own any of the blue-chip assets. At the same time, I like the idea of having my photo as profile picture. So, I decided to create an NFT collection and to mint my photo as an NFT. While at it, I will make a tutorial out of this.</p>

<h2 id="summary">Summary</h2>
<p>While I will not go into too much detail, I will outline the entire process, from storing the images and metadata, to creating and deploying the collection smart contract, and everything in between. In particular, I will cover the storage of images and metadata more extensively, since I believe many of the NFT collections are weak on this side.</p>

<p>Here is a list of the topics I will cover:</p>
<ul>
  <li>Storing information on <a href="https://ipfs.io">IPFS</a>;</li>
  <li>Installing a smart contract development environment (I will use <a href="https://hardhat.org">Hardhat</a> for this);</li>
  <li>Creating an NFT collection, following the <a href="https://ethereum.org/en/developers/docs/standards/tokens/erc-721/">ERC-721 standard</a>, and using <a href="https://www.openzeppelin.com/contracts">OpenZeppelin contracts</a>;</li>
  <li>Deploying the collection to a testnet first, and to the mainnet after;</li>
  <li>Minting images and, finally, using them as a profile photo on Twitter.</li>
</ul>

<h3 id="disclaimers">Disclaimers</h3>
<ol>
  <li>In this post I will focus on the Ethereum blockchain only;</li>
  <li>The main objective here is to get through the entire process relatively quickly; you need some basic understanding of modern development to follow.</li>
</ol>

<h2 id="1-storage">1. Storage</h2>
<p>I am sure everyone has read something about NFTs (and web3 in general) not being truly decentralized: if not, I recommend you have a look at <a href="https://moxie.org/2022/01/07/web3-first-impressions.html">this famous blog post</a> by <a href="https://en.wikipedia.org/wiki/Moxie_Marlinspike">Moxie Marlinspike</a>.</p>

<p>One of the main points of concern is that NFTs does not include the content (an image, video, song, or anything), but only a <a href="https://en.wikipedia.org/wiki/Uniform_Resource_Identifier">URI</a> pointing to it. The content can very well be stored on someone’s private server. This gives no guarantees that the content will be available in the future, or that it will not be changed.</p>

<h3 id="ipfs">IPFS</h3>
<p>One solution is to use an immutable file storage, like <a href="https://ipfs.io">IPFS</a>. Unfortunately, most people don’t understand how IPFS works: while it guarantees that the content will not change, it does not guarantee that it will be online. I can run an IPFS node on my laptop and add files, but the moment my laptop goes offline, those files will not be available anymore. There are <em>pinning services</em>, which can maintain the content online on your behalf: the best known is <a href="https://www.pinata.cloud">Pinata</a>, and offers free accounts. This is a better solution, but it does not guarantee that the content will be available indefinitely: Pinata’s users can decide to <em>unpin</em> content from their account at any moment. If they do, there is no guarantee that the content will be available.</p>

<p>We will use a different service, called <a href="https://nft.storage">NFT.Storage</a>. The service is completely free, and leverages <a href="https://filecoin.io">Filecoin</a> to keep the content online. If you are curious about how they can keep content online for free, have a look at <a href="https://nft.storage/faq/#how-is-nft-storage-free-to-use">their FAQ</a>.</p>

<h2 id="2-development-environment">2. Development Environment</h2>
<p>
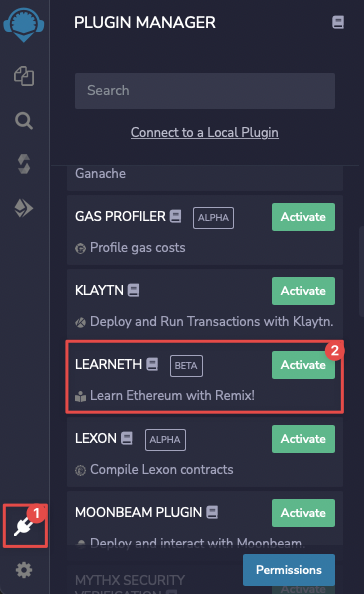
The development ecosystem for Ethereum smart contracts is quite rich today, both in terms of environments and languages. If you decide to stick with the main language, <a href="https://docs.soliditylang.org">Solidity</a>, the three main development tools are: <a href="https://remix.ethereum.org">Remix</a>, the <a href="https://trufflesuite.com">Truffle Suite</a>, and <a href="https://hardhat.org">Hardhat</a>. If you are a beginner, I recommend you try out Remix: there is nothing to install—it runs in the browser—and it includes awesome tutorials (they will be available if you install the <em>LEARNETH</em> plugin, as shown in the screenshot below).</p>

<p><img src="/assets/posts/2022-07-17-minting-myself-into-nft-for-twitter/CleanShot 2022-07-10 at 13.48.57.png" alt="" /></p>

<p>While remix would have been perfect for this task, I decided to use Hardhat. The main reason is that I’m a bit allergic to advanced IDEs and I prefer to do everything in the terminal, using <a href="https://github.com/tmux/tmux">tmux</a> and <a href="https://neovim.io">vim</a>.</p>

<p>To use Hardhat you need <a href="https://nodejs.org">Node.js</a>. I will not go through the details of installing it; I will use version <a href="https://nodejs.org/en/blog/release/v6.16.0/">16.16.0 LTS</a>, which I have installed using <a href="https://github.com/nvm-sh/nvm">nvm</a>:</p>

<div class="language-shell highlighter-rouge"><div class="highlight"><pre class="highlight"><code>nvm <span class="nb">install </span>16.16
nvm use 16.16
</code></pre></div></div>

<p>At this point, you can follow the steps from the official <a href="https://hardhat.org/hardhat-runner/docs/guides/project-setup">Hardhat Guide</a> to install Hardhat and create your project. We are also going to use the <a href="https://hardhat.org/hardhat-runner/plugins/nomiclabs-hardhat-etherscan">hardhat-etherscan</a> plugin, so our smart contract will be verified on <a href="https://info.etherscan.com/types-of-contract-verification/">Etherscan</a>.</p>

<h2 id="3-creating-the-collection">3. Creating the Collection</h2>
<p>On the blockchain, an NFT collection is just a Smart Contract. There are two standards suitable for this type of tokens: <a href="https://docs.openzeppelin.com/contracts/3.x/erc721">ERC-721</a> and <a href="https://docs.openzeppelin.com/contracts/3.x/erc1155">ERC-1155</a>. The latter covers advanced use cases, specifically for gaming, so I will use the classic ERC-721. Most of the blue-chip NFT collections are built following this standard as well.</p>

<p>Since this collection will represent me, and my usual name on social media is <code class="language-plaintext highlighter-rouge">taglia</code>, I have decided to call it “TagliaMyselves” and to use “TAGLIA” as symbol. Please change these values if you are following the tutorial.</p>

<p>We will start by installing Hardhat and initializing a project inside an empty folder:</p>

<div class="language-shell highlighter-rouge"><div class="highlight"><pre class="highlight"><code><span class="nb">mkdir </span>taglia_myselves
<span class="nb">cd </span>taglia_myselves
npm <span class="nb">install</span> <span class="nt">--save-dev</span> hardhat
</code></pre></div></div>

<p>This will install Hardhat and all of its dependencies. At this point, we need to initialize the project, and we do this by simply running <code class="language-plaintext highlighter-rouge">npx hardhat</code> (which will prepare an appropriate folder structure). We will create a simple JavaScript project:</p>

<p><img src="/assets/posts/2022-07-17-minting-myself-into-nft-for-twitter/CleanShot 2022-07-16 at 23.30.10.png" alt="" />
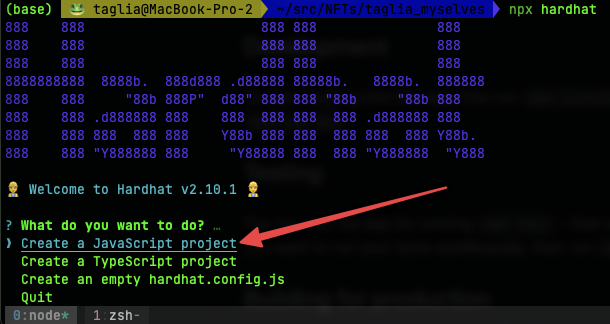
We will choose the defaults for all the other points.</p>

<p>Now, your directory should look like so:</p>

<div class="language-shell highlighter-rouge"><div class="highlight"><pre class="highlight"><code>README.md         contracts         hardhat.config.js node_modules      package-lock.json package.json      scripts           <span class="nb">test</span>
</code></pre></div></div>

<p>We will focus on three key components:</p>

<ol>
  <li><code class="language-plaintext highlighter-rouge">hardhat.config.js</code>: this is the configuration file, where we specify the Hardhat plugins that we will use, and the networks that we will use for deployment;</li>
  <li>The smart contract itself, which we will generate using OpenZeppelin’s wizard, and which will be stored in the <code class="language-plaintext highlighter-rouge">contracts</code> directory;</li>
  <li>The deployment script, <code class="language-plaintext highlighter-rouge">scripts/deploy.js</code>.</li>
</ol>

<p>I have changed my configuration file, <code class="language-plaintext highlighter-rouge">hardhat.config.js</code>, like so:</p>

<div class="language-js highlighter-rouge"><div class="highlight"><pre class="highlight"><code><span class="nf">require</span><span class="p">(</span><span class="dl">"</span><span class="s2">@nomicfoundation/hardhat-toolbox</span><span class="dl">"</span><span class="p">);</span>
<span class="nf">require</span><span class="p">(</span><span class="dl">"</span><span class="s2">@nomiclabs/hardhat-etherscan</span><span class="dl">"</span><span class="p">);</span>

<span class="cm">/** @type import('hardhat/config').HardhatUserConfig */</span>
<span class="nx">module</span><span class="p">.</span><span class="nx">exports</span> <span class="o">=</span> <span class="p">{</span>
  <span class="na">solidity</span><span class="p">:</span> <span class="dl">"</span><span class="s2">0.8.9</span><span class="dl">"</span><span class="p">,</span>
  <span class="na">paths</span><span class="p">:</span> <span class="p">{</span>                         <span class="c1">// add this</span>
    <span class="na">artifacts</span><span class="p">:</span> <span class="dl">'</span><span class="s1">./src/artifacts</span><span class="dl">'</span><span class="p">,</span>  <span class="c1">// this is where our compiled contracts will go</span>
  <span class="p">},</span>
  <span class="na">networks</span><span class="p">:</span> <span class="p">{</span>
    <span class="na">hardhat</span><span class="p">:</span> <span class="p">{</span>
      <span class="na">chainId</span><span class="p">:</span> <span class="mi">1337</span><span class="p">,</span>
    <span class="p">},</span>
    <span class="na">mainnet</span><span class="p">:</span> <span class="p">{</span>
      <span class="na">url</span><span class="p">:</span> <span class="dl">"</span><span class="s2">YOUR INFURA MAINNET ENDPOINT</span><span class="dl">"</span><span class="p">,</span>
      <span class="na">accounts</span><span class="p">:</span> <span class="p">[</span>
        <span class="dl">"</span><span class="s2">YOUR WALLET PRIVATE KEY</span><span class="dl">"</span>
      <span class="p">],</span>
    <span class="p">},</span>
    <span class="na">ropsten</span><span class="p">:</span> <span class="p">{</span>
      <span class="na">url</span><span class="p">:</span> <span class="dl">"</span><span class="s2">YOUR INFURA ROPSTEN ENDPOINT</span><span class="dl">"</span><span class="p">,</span>
      <span class="na">accounts</span><span class="p">:</span> <span class="p">[</span>
        <span class="dl">"</span><span class="s2">YOUR WALLET PRIVATE KEY</span><span class="dl">"</span>
      <span class="p">],</span>
    <span class="p">},</span>
  <span class="p">},</span>
  <span class="na">etherscan</span><span class="p">:</span> <span class="p">{</span>
    <span class="na">apiKey</span><span class="p">:</span> <span class="dl">"</span><span class="s2">YOUR_ETHERSCAN_API_KEY</span><span class="dl">"</span>
  <span class="p">},</span>
<span class="p">};</span>
</code></pre></div></div>

<p>A couple of things to note:</p>
<ol>
  <li>I have added the <code class="language-plaintext highlighter-rouge">hardhat-ehterscan</code> plugin: this allows me to verify the smart contract very simply. A verified smart contract has a green checkmark on Etherscan, and its source code is visible by everyone; this plugin needs to be installed, by issuing this command: <code class="language-plaintext highlighter-rouge">npm install --save-dev @nomiclabs/hardhat-etherscan</code>.</li>
  <li>I have added the Etherscan API key, so the plugin can work (you need to create an account on Etherscan, and copy your API key for this to work).</li>
  <li>I have added three networks:
    <ol>
      <li><code class="language-plaintext highlighter-rouge">hardhat</code>: this is a development network, created by Hardhat itself, and running locally;</li>
      <li><code class="language-plaintext highlighter-rouge">ropsten</code>: a public testnet<sup id="fnref:1" role="doc-noteref"><a href="#fn:1" class="footnote" rel="footnote">1</a></sup>. You have to add your wallet’s <em>private key</em> here (more on this later);</li>
      <li><code class="language-plaintext highlighter-rouge">mainnet</code>: the main Ethereum blockchain.</li>
    </ol>
  </li>
  <li>
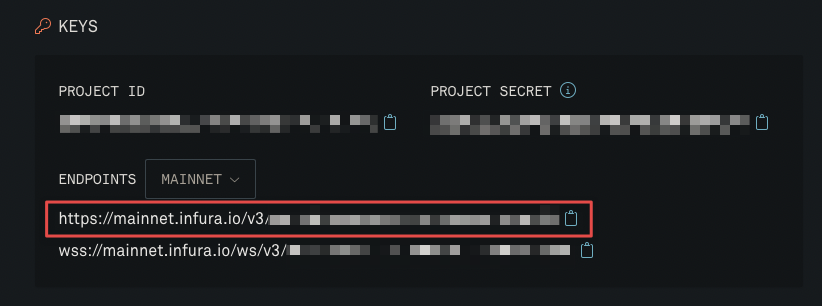
I am not running a full Ethereum node on my laptop, for simplicity I decided to use <a href="https://infura.io">Infura</a> for this. All you need to do is to create a free account on Infura, create a project of type <code class="language-plaintext highlighter-rouge">Ethereum</code>, copy the endpoints for Ropsten and Mainnet, and paste them into your configuration file.</li>
</ol>

<p><img src="/assets/posts/2022-07-17-minting-myself-into-nft-for-twitter/CleanShot 2022-07-16 at 23.47.22.png" alt="" /></p>
<h3 id="31-creating-the-smart-contract">3.1 Creating the Smart Contract</h3>
<p>
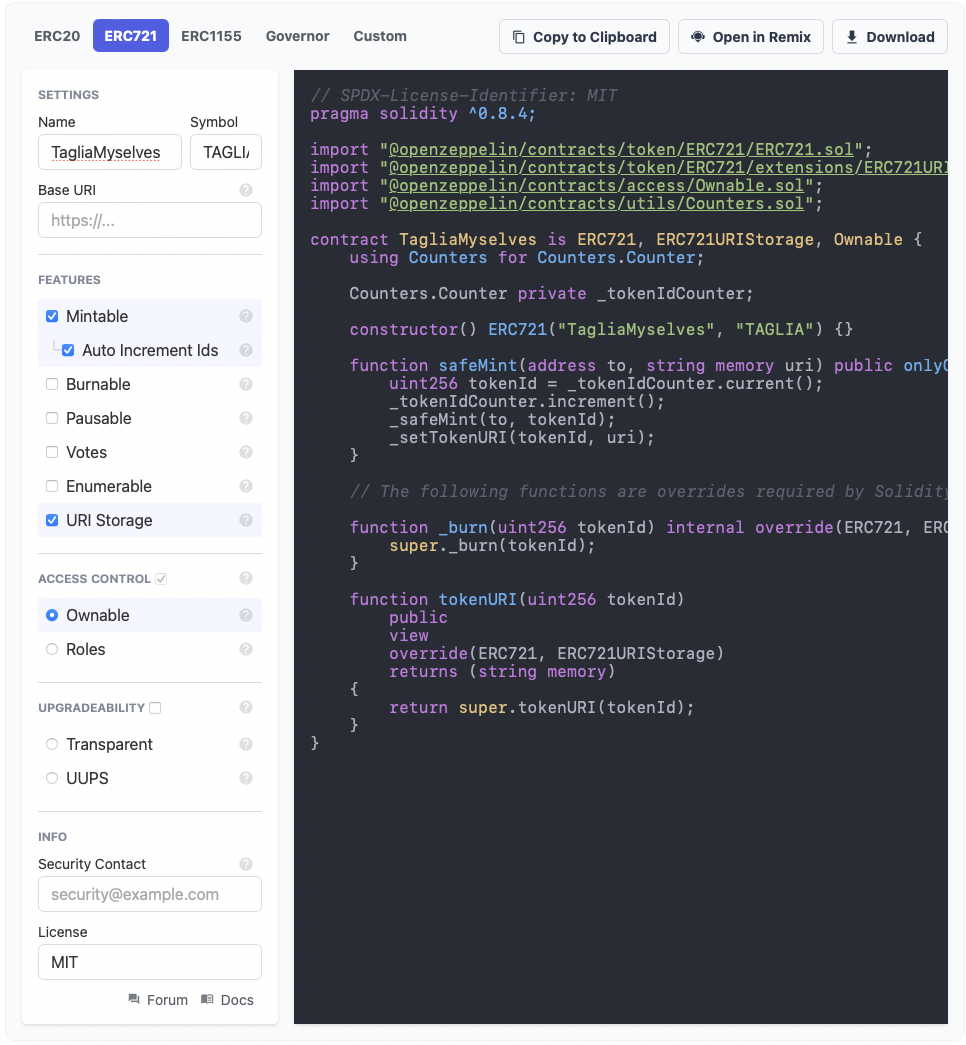
Solidity development is not in the scope of this tutorial, so for this exercise we will use <a href="https://docs.openzeppelin.com/contracts/4.x/wizard">OpenZeppelin’s Wizard</a>. This is the way I have configured my contract:</p>

<p><img src="/assets/posts/2022-07-17-minting-myself-into-nft-for-twitter/CleanShot 2022-07-17 at 14.31.00.png" alt="" /></p>

<p>Let’s go through the configuration step by step:</p>
<ul>
  <li><strong>Contract Type</strong>: As you can see from the selected tab, at the top, I have chosen ERC-721, as discussed earlier in this post;</li>
  <li><strong>Settings</strong>:
    <ul>
      <li><strong>Name</strong> and <strong>Symbol</strong> are quite obvious;</li>
      <li><strong>Base URI</strong> is essential, and I will go a bit deeper. In an NFT collection, each token has a URI which points to its metadata (the location of the image is specified inside the metadata); this token URI is built by concatenating the base URI with the token ID. So, assuming we are minting token 19, its token URI will simply be the collection’s base URI with “19” appended. This is usually done by creating a directory, and storing the metadata JSON file for each token inside it, appropriately named. Since IPFS is an immutable file system, the Content ID (CID) of a directory will change every time its content changes. So, this approach is only valid if we can create all the NFT images and metadata <strong>before we create the smart contract</strong>. If we upload everything at the same time, we will get a single CID for the directory containing the metadata. I want to be able to add new images at any time, so I can’t use this approach. One could argue that I could get a constant directory URI by using <a href="https://cf-ipfs.com/ipns/docs.ipfs.io/concepts/ipns/">IPNS</a>, but in that case, I must forego immutability. I will always be able to change the content of existing tokens in the future, and this goes against the concept of NFT in my opinion. By leaving the base URI empty, we will be able to set a different URI for each token.</li>
    </ul>
  </li>
  <li><strong>Features</strong>:
    <ul>
      <li><strong>Mintable</strong>: I want to be able to mint new tokens whenever I intend to use a different photo, and I would rather avoid manually assigning a token ID every time.</li>
      <li><a href="https://docs.openzeppelin.com/contracts/4.x/api/token/erc721#ERC721Enumerable">Enumerable</a>: This increases the gas cost, and is useful if you are creating a collection that you wish to trade. I have not enabled this, since this collection is for my personal use only.</li>
      <li><a href="https://docs.openzeppelin.com/contracts/4.x/api/token/erc721#ERC721URIStorage">URI Storage</a>: This is required, since we are not using the <strong>Base URI</strong> option. We will be able to set a specific URI for every token, when it is minted.</li>
      <li><strong>Other features</strong>: I invite you to read more about the various features.</li>
    </ul>
  </li>
  <li><a href="https://docs.openzeppelin.com/contracts/4.x/api/access">Access Control</a>: I have chosen the simple model, <a href="https://docs.openzeppelin.com/contracts/4.x/api/access#Ownable">Ownable</a>, since I am the only one interacting with the contract and I do not need roles.</li>
  <li><a href="https://docs.openzeppelin.com/openzeppelin/upgrades">Upgradeability</a>: I don’t need the ability to upgrade the contract in the future.</li>
  <li><strong>Info</strong>: This section is quite self-explanatory.</li>
</ul>

<p><strong>Note</strong>: the wizard does not include a way to limit the number of minted tokens. I don’t need that, but if you do, you need to modify the <code class="language-plaintext highlighter-rouge">safeMint</code> function to take that into account.</p>

<p>As you can see, the smart contract is simple, and we can use it straight away. Please customize the various elements to your liking (<code class="language-plaintext highlighter-rouge">YOUR@EMAIL.HERE</code>, <code class="language-plaintext highlighter-rouge">CollectionContractName</code>, <code class="language-plaintext highlighter-rouge">YOUR_TOKEN_NAME</code>, <code class="language-plaintext highlighter-rouge">YOUR_TOKEN_SYMBOL</code>).</p>

<div class="language-js highlighter-rouge"><div class="highlight"><pre class="highlight"><code><span class="c1">// SPDX-License-Identifier: MIT</span>
<span class="nx">pragma</span> <span class="nx">solidity</span> <span class="o">^</span><span class="mf">0.8</span><span class="p">.</span><span class="mi">9</span><span class="p">;</span>

<span class="k">import</span> <span class="dl">"</span><span class="s2">@openzeppelin/contracts/token/ERC721/ERC721.sol</span><span class="dl">"</span><span class="p">;</span>
<span class="k">import</span> <span class="dl">"</span><span class="s2">@openzeppelin/contracts/token/ERC721/extensions/ERC721URIStorage.sol</span><span class="dl">"</span><span class="p">;</span>
<span class="k">import</span> <span class="dl">"</span><span class="s2">@openzeppelin/contracts/access/Ownable.sol</span><span class="dl">"</span><span class="p">;</span>
<span class="k">import</span> <span class="dl">"</span><span class="s2">@openzeppelin/contracts/utils/Counters.sol</span><span class="dl">"</span><span class="p">;</span>

<span class="c1">/// @custom:security-contact YOUR@EMAIL.HERE</span>
<span class="nx">contract</span> <span class="nx">CollectionContractName</span> <span class="nx">is</span> <span class="nx">ERC721</span><span class="p">,</span> <span class="nx">ERC721URIStorage</span><span class="p">,</span> <span class="nx">Ownable</span> <span class="p">{</span>
    <span class="nx">using</span> <span class="nx">Counters</span> <span class="k">for</span> <span class="nx">Counters</span><span class="p">.</span><span class="nx">Counter</span><span class="p">;</span>

    <span class="nx">Counters</span><span class="p">.</span><span class="nx">Counter</span> <span class="kr">private</span> <span class="nx">_tokenIdCounter</span><span class="p">;</span>

    <span class="nf">constructor</span><span class="p">()</span> <span class="nc">ERC721</span><span class="p">(</span><span class="dl">"</span><span class="s2">YOUR_TOKEN_NAME</span><span class="dl">"</span><span class="p">,</span> <span class="dl">"</span><span class="s2">YOUR_TOKEN_SYMBOL</span><span class="dl">"</span><span class="p">)</span> <span class="p">{}</span>

    <span class="kd">function</span> <span class="nf">safeMint</span><span class="p">(</span><span class="nx">address</span> <span class="nx">to</span><span class="p">,</span> <span class="nx">string</span> <span class="nx">memory</span> <span class="nx">uri</span><span class="p">)</span> <span class="kr">public</span> <span class="nx">onlyOwner</span> <span class="p">{</span>
        <span class="nx">uint256</span> <span class="nx">tokenId</span> <span class="o">=</span> <span class="nx">_tokenIdCounter</span><span class="p">.</span><span class="nf">current</span><span class="p">();</span>
        <span class="nx">_tokenIdCounter</span><span class="p">.</span><span class="nf">increment</span><span class="p">();</span>
        <span class="nf">_safeMint</span><span class="p">(</span><span class="nx">to</span><span class="p">,</span> <span class="nx">tokenId</span><span class="p">);</span>
        <span class="nf">_setTokenURI</span><span class="p">(</span><span class="nx">tokenId</span><span class="p">,</span> <span class="nx">uri</span><span class="p">);</span>
    <span class="p">}</span>

    <span class="c1">// The following functions are overrides required by Solidity.</span>

    <span class="kd">function</span> <span class="nf">_burn</span><span class="p">(</span><span class="nx">uint256</span> <span class="nx">tokenId</span><span class="p">)</span> <span class="nx">internal</span> <span class="nf">override</span><span class="p">(</span><span class="nx">ERC721</span><span class="p">,</span> <span class="nx">ERC721URIStorage</span><span class="p">)</span> <span class="p">{</span>
        <span class="k">super</span><span class="p">.</span><span class="nf">_burn</span><span class="p">(</span><span class="nx">tokenId</span><span class="p">);</span>
    <span class="p">}</span>

    <span class="kd">function</span> <span class="nf">tokenURI</span><span class="p">(</span><span class="nx">uint256</span> <span class="nx">tokenId</span><span class="p">)</span>
        <span class="kr">public</span>
        <span class="nx">view</span>
        <span class="nf">override</span><span class="p">(</span><span class="nx">ERC721</span><span class="p">,</span> <span class="nx">ERC721URIStorage</span><span class="p">)</span>
        <span class="nf">returns </span><span class="p">(</span><span class="nx">string</span> <span class="nx">memory</span><span class="p">)</span>
    <span class="p">{</span>
        <span class="k">return</span> <span class="k">super</span><span class="p">.</span><span class="nf">tokenURI</span><span class="p">(</span><span class="nx">tokenId</span><span class="p">);</span>
    <span class="p">}</span>
<span class="p">}</span>
</code></pre></div></div>

<p>I have stored this code in a new contract file, called <code class="language-plaintext highlighter-rouge">contracts/TagliaMyselves.sol</code>. You should name this file according to your contract name.</p>

<p>Of course, we need to install the OpenZeppelin contracts in our project, like so:</p>

<div class="language-shell highlighter-rouge"><div class="highlight"><pre class="highlight"><code>npm <span class="nb">install</span> @openzeppelin/contracts
</code></pre></div></div>

<p><strong>Note</strong>: You might have to update the <code class="language-plaintext highlighter-rouge">pragma solidity</code> like in your smart contract, if that is different from the version you have installed. In my case, the wizard generated it with <code class="language-plaintext highlighter-rouge">^0.8.4</code>, and I changed it to <code class="language-plaintext highlighter-rouge">^0.8.9</code>. You can check which version hardhat installed by looking at the demo contract that it created (<code class="language-plaintext highlighter-rouge">contracts/Lock.sol</code>).</p>

<h3 id="32-creating-the-deployment-scripts">3.2 Creating the deployment scripts</h3>
<p>Although I want to store this contract on my hardware wallet, for simplicity I will deploy it using a software wallet, and transfer the ownership later. This is the deployment script, please customize the contract and file names according to how you named your smart contract.</p>

<p><code class="language-plaintext highlighter-rouge">scripts/deploy.js</code></p>
<div class="language-js highlighter-rouge"><div class="highlight"><pre class="highlight"><code><span class="kd">const</span> <span class="nx">hre</span> <span class="o">=</span> <span class="nf">require</span><span class="p">(</span><span class="dl">"</span><span class="s2">hardhat</span><span class="dl">"</span><span class="p">);</span>

<span class="k">async</span> <span class="kd">function</span> <span class="nf">main</span><span class="p">()</span> <span class="p">{</span>
  <span class="kd">const</span> <span class="nx">TagliaMyselves</span> <span class="o">=</span> <span class="k">await</span> <span class="nx">hre</span><span class="p">.</span><span class="nx">ethers</span><span class="p">.</span><span class="nf">getContractFactory</span><span class="p">(</span><span class="dl">"</span><span class="s2">TagliaMyselves</span><span class="dl">"</span><span class="p">);</span>
  <span class="kd">const</span> <span class="nx">taglia_myselves</span> <span class="o">=</span> <span class="k">await</span> <span class="nx">TagliaMyselves</span><span class="p">.</span><span class="nf">deploy</span><span class="p">();</span>

  <span class="k">await</span> <span class="nx">taglia_myselves</span><span class="p">.</span><span class="nf">deployed</span><span class="p">();</span>

  <span class="nx">console</span><span class="p">.</span><span class="nf">log</span><span class="p">(</span><span class="dl">"</span><span class="s2">TagliaMyselves deployed at:</span><span class="dl">"</span><span class="p">,</span> <span class="nx">taglia_myselves</span><span class="p">.</span><span class="nx">address</span><span class="p">);</span>
<span class="p">}</span>

<span class="c1">// We recommend this pattern to be able to use async/await everywhere</span>
<span class="c1">// and properly handle errors.</span>
<span class="nf">main</span><span class="p">().</span><span class="k">catch</span><span class="p">((</span><span class="nx">error</span><span class="p">)</span> <span class="o">=&gt;</span> <span class="p">{</span>
  <span class="nx">console</span><span class="p">.</span><span class="nf">error</span><span class="p">(</span><span class="nx">error</span><span class="p">);</span>
  <span class="nx">process</span><span class="p">.</span><span class="nx">exitCode</span> <span class="o">=</span> <span class="mi">1</span><span class="p">;</span>
<span class="p">});</span>
</code></pre></div></div>

<p>Please update these files using the contract name and file name that you used above.</p>
<h2 id="4-deployment">4. Deployment</h2>
<p>We will do a quick test, deploying locally, followed by deploying on the testnet, and finally on mainnet.</p>

<h3 id="41-local-deployment">4.1 Local deployment</h3>
<p>To deploy locally, we need to start a node which will simulate a full Ethereum node. Hardhat makes this simple, you just have to run this command:</p>

<div class="language-shell highlighter-rouge"><div class="highlight"><pre class="highlight"><code>npx hardhat node
</code></pre></div></div>

<p>This will create 20 accounts, with 10,000 ETH each. The output of the command is clear, but please <strong>NEVER use those private keys on anything which is not running locally</strong>. At this point, we can deploy with this command (you need to use another terminal window or tab; I use <a href="https://github.com/tmux/tmux">tmux</a> which makes all this effortless):</p>

<div class="language-shell highlighter-rouge"><div class="highlight"><pre class="highlight"><code>npx hardhat run scripts/deploy.js <span class="nt">--network</span> hardhat

<span class="o">&gt;</span> TagliaMyselves deployed at: 0x5FbDB2315678afecb367f032d93F642f64180aa3
</code></pre></div></div>

<p>The deployment should be successful. If it is, you will see the contract address. If you like, you can interact with your contract by using the console: <code class="language-plaintext highlighter-rouge">npx hardhat console</code>. Kindly note that not everything will work on this simulated node.</p>
<h3 id="42-ropsten">4.2 Ropsten</h3>
<p>As next step, we will deploy onto the Ropsten testnet, and try the <code class="language-plaintext highlighter-rouge">safeMint</code> function. There are a couple of steps here that I did not mention earlier. I will use <a href="https://metamask.io/">Metamask</a>: once you have installed the extension in your browser and configured it, you need to switch to the Ropsten network. You can follow this video to do that:</p>

<p><img src="/assets/posts/2022-07-17-minting-myself-into-nft-for-twitter/CleanShot 2022-07-17 at 11.58.06.gif" alt="" /></p>

<p>Your wallet will initially be empty; you can get some ETH using a <em>faucet</em>. You can just search for “ropsten faucet” and pick one of the results; the last one I used is <a href="https://faucet.egorfine.com/">Ropsten testnet faucet</a>, and I believe it sends you 1 ETH every day.</p>

<p>To deploy a smart contract, you need to sign a transaction, and for that you must use your account’s private key. You should add the key to your <code class="language-plaintext highlighter-rouge">hardhat.config.js</code> file, in the Ropsten section, under <code class="language-plaintext highlighter-rouge">accounts</code>. Please see above in this post, where I have added the content of the file. In Metamask, you can get your private key by clicking on the three vertical dots next to your account name, and selecting “Account details”. <strong>Please be very prudent when handling private keys</strong>, and never share them if you are dealing with the mainnet.</p>

<p>Now, to deploy, you need to use this command:</p>

<div class="language-shell highlighter-rouge"><div class="highlight"><pre class="highlight"><code>npx hardhat run scripts/deploy.js <span class="nt">--network</span> ropsten

<span class="o">&gt;</span> TagliaMyselves deployed at: 0xfB4268c4Bc79eCF5567581f6b0Eaf918dc018c95
</code></pre></div></div>

<p>This will contact Infura and deploy your contract on the Ropsten network. If you go to <a href="https://ropsten.etherscan.io/">Etherscan on Ropsten</a> and enter your contract address, you will already see it. The contract is not verified, though, which makes interacting with it more difficult. Hardhat simplifies the contract verification. If you followed the tutorial from the beginning, you should have your Etherscan API key in the Hardhat configuration file, and you should have installed the appropriate plugin. You can verify the contract with just one command:</p>

<div class="language-shell highlighter-rouge"><div class="highlight"><pre class="highlight"><code>npx hardhat verify <span class="nt">--network</span> ropsten 0xfB4268c4Bc79eCF5567581f6b0Eaf918dc018c95 <span class="c"># &lt;- Replace this with the address of your contract</span>

<span class="o">&gt;</span> Nothing to compile
<span class="o">&gt;</span> Successfully submitted <span class="nb">source </span>code <span class="k">for </span>contract
<span class="o">&gt;</span> contracts/TagliaMyselves.sol:TagliaMyselves at 0xfB4268c4Bc79eCF5567581f6b0Eaf918dc018c95
<span class="o">&gt;</span> <span class="k">for </span>verification on the block explorer. Waiting <span class="k">for </span>verification result...

<span class="o">&gt;</span> Successfully verified contract TagliaMyselves on Etherscan.
<span class="o">&gt;</span> https://ropsten.etherscan.io/address/0xfB4268c4Bc79eCF5567581f6b0Eaf918dc018c95#code
</code></pre></div></div>

<p>Of course, you need to use your smart contract address, which you got when you deployed. If you reload your contract page on Etherscan now, you will see the source code (in the Contract tab), and you will be able to interact with it. This is very convenient, and spares me from having to write an app to interact with the contract. Let’s try to mint our first test token:</p>

<ol>
  <li>On Etherscan, click on the “Contract” tab (which now has a green checkmark, since the contract is verified);</li>
  <li>Go to the “Write Contract” section;</li>
  <li>Click on the “Connect to Web3” button, and connect it to your Metamask;</li>
  <li>Expand the “safeMint” function, add your wallet address as the <code class="language-plaintext highlighter-rouge">to</code> argument, and whatever you want as <code class="language-plaintext highlighter-rouge">uri</code> (we will use something sensible on mainnet, no need to worry for now);</li>
  <li>Click on “Write”.</li>
</ol>

<p>At this point, Metamask will ask you to approve the transaction. This is a regular transaction, and it writes data to the blockchain; as such, it requires gas. If you followed the instructions earlier, and got some ETH from the faucet, everything should work once you approve the transaction in Metamask. This is the first token minted, so it has ID 0 (zero). If you go to the “Read Contract” section, on Etherscan, you can verify that token 0 has the URI that you set (use the <code class="language-plaintext highlighter-rouge">tokenURI</code> function, and set <code class="language-plaintext highlighter-rouge">tokenId</code> to 0). You can mint other tokens and play around with the contract.</p>

<p>We are finally ready to deploy to mainnet!</p>

<h3 id="43-mainnet">4.3 Mainnet</h3>
<p>The process of deploying on mainnet is the same as it was on testnet; we just indicate the correct network.</p>

<div class="language-shell highlighter-rouge"><div class="highlight"><pre class="highlight"><code>npx hardhat run scripts/deploy.js <span class="nt">--network</span> mainnet
</code></pre></div></div>

<p>Again, after deploying the contract, we will verify it as we did earlier on Ropsten.</p>

<p>There is just one missing component before I can finally mint my photo: <strong>the metadata</strong>.</p>

<h2 id="5-metadata">5. Metadata</h2>
<p>NFT metadata are stored in a <a href="https://www.json.org/">JSON file</a>, and the URI of a token will point to this file. The file has some standard properties that all marketplaces and other actors (Metamask, Twitter, etc.) can read. I will just use some basic properties, since I do not intend to trade these tokens, and I do not care about anyone calculating the rarity, or showing each token’s traits.</p>

<p>This is the metadata I will attach to my first token:</p>

<div class="language-json highlighter-rouge"><div class="highlight"><pre class="highlight"><code><span class="p">{</span><span class="w">
  </span><span class="nl">"name"</span><span class="p">:</span><span class="w"> </span><span class="s2">"Cesare Tagliaferri"</span><span class="p">,</span><span class="w">
  </span><span class="nl">"description"</span><span class="p">:</span><span class="w"> </span><span class="s2">"Portrait photo"</span><span class="p">,</span><span class="w">
  </span><span class="nl">"image"</span><span class="p">:</span><span class="w"> </span><span class="s2">"ipfs://bafkreihxigpbhmaxkmsyxkssfxhsrod5dqaspj7ma6nmwmp2ycvlsam2gm"</span><span class="w">
</span><span class="p">}</span><span class="w">
</span></code></pre></div></div>

<p>The <code class="language-plaintext highlighter-rouge">ipfs://</code> URI corresponding to the <em>image</em> key, is what I got from <a href="https://nft.storage">nft.storage</a> when I uploaded my photo. I used their application, called “NFT UP”, which is super simple to use.</p>

<p>Once I have saved the JSON object into a file, I can upload it to IPFS too, using NFT Storage again.</p>

<h2 id="6-minting-a-token-with-my-photo-and-using-it-on-twitter">6. Minting a token with my photo and using it on Twitter</h2>
<p>Now we have all the components ready. We just need to mint one token on mainnet, using the IPFS URI pointing to the metadata. Once this is done, you will immediately see your token using the mobile version of Metamask, or if you log into any marketplace with the wallet where you stored the minted token. Every service uses some APIs to read the token’s metadata, so you will have to wait for a while before you see your image on a marketplace, or before Twitter accepts it as profile photo.</p>

<h2 id="conclusion">Conclusion</h2>
<p>
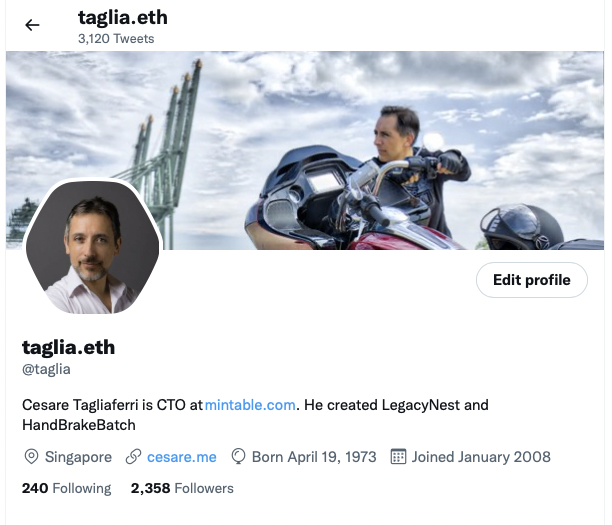
While not planned, this ended up being a very long post! I hope it will help someone else, definitely I learned a lot while writing it. And now, let me show off my Twitter profile.</p>

<p><img src="/assets/posts/2022-07-17-minting-myself-into-nft-for-twitter/CleanShot 2022-07-17 at 19.42.52.png" alt="" /></p>

<div class="footnotes" role="doc-endnotes">
  <ol>
    <li id="fn:1" role="doc-endnote">
      <p>It is worth noting that <a href="https://blog.ethereum.org/2022/06/21/testnet-deprecation/">Ropsten will be shut down soon</a>: unfortunately, I have seen this when I was almost done with this, but you can follow the same steps using one of the other testnets. <a href="#fnref:1" class="reversefootnote" role="doc-backlink">&#8617;</a></p>
    </li>
  </ol>
</div>]]></content><author><name>Cesare Tagliaferri</name></author><category term="Tutorials" /><category term="nft" /><category term="crypto" /><category term="development" /><category term="tutorials" /><category term="twitter" /><summary type="html"><![CDATA[The idea behind this post came to me from Twitter’s initiative, allowing users to set an NFT as profile picture. Unfortunately, I arrived into the NFT world late, and I do not own any of the blue-chip assets. At the same time, I like the idea of having my photo as profile picture. So, I decided to create an NFT collection and to mint my photo as an NFT.]]></summary><media:thumbnail xmlns:media="http://search.yahoo.com/mrss/" url="https://osomac.com/assets/img/osomac-image.jpg" /><media:content medium="image" url="https://osomac.com/assets/img/osomac-image.jpg" xmlns:media="http://search.yahoo.com/mrss/" /></entry><entry><title type="html">Fintech Forum - Building for NFTs</title><link href="https://osomac.com/2022/07/02/fintech-forum-building-nft/" rel="alternate" type="text/html" title="Fintech Forum - Building for NFTs" /><published>2022-07-02T00:00:00+00:00</published><updated>2022-07-02T00:00:00+00:00</updated><id>https://osomac.com/2022/07/02/fintech-forum-building-nft</id><content type="html" xml:base="https://osomac.com/2022/07/02/fintech-forum-building-nft/"><![CDATA[<p><a href="/assets/posts/2022-07-02-fintech-forum-building-nft/AWS_fintech forum_session_4.png"><img src="/assets/posts/2022-07-02-fintech-forum-building-nft/AWS_fintech forum_session_4.png" alt="AWS Fintech Forum Session 4" /></a></p>

<p>Earlier this week, I had the pleasure of recording a session for the Fintech Forum, representing <a href="https://mintable.com">Mintable</a>.</p>

<p>It is an interesting conversation about <a href="https://en.wikipedia.org/wiki/Non-fungible_token">NFTs</a>, a bit more technical than what you usually find on this subject. We cover the technical challenges of building NFTs (including how to start and what tools to use), and the challenges of building an NFT marketplace.</p>

<p>The event—hosted by Tech in Asia and AWS—is on July 7, 2022, and is free. You can register <a href="https://www.eventbrite.sg/e/fintech-forum-tickets-352473025307">here</a>. If I can, I will post the session after the event.</p>]]></content><author><name>Cesare Tagliaferri</name></author><category term="Events" /><category term="nft" /><category term="crypto" /><category term="fintech" /><category term="development" /><category term="marketplaces" /><summary type="html"><![CDATA[Earlier this week, I had the pleasure of recording a session for a Fintech Forum, about NFTs and marketplaces.]]></summary><media:thumbnail xmlns:media="http://search.yahoo.com/mrss/" url="https://osomac.com/assets/posts/2022-07-02-fintech-forum-building-nft/AWS_fintech%20forum_session_4.png" /><media:content medium="image" url="https://osomac.com/assets/posts/2022-07-02-fintech-forum-building-nft/AWS_fintech%20forum_session_4.png" xmlns:media="http://search.yahoo.com/mrss/" /></entry><entry><title type="html">Global Mute using Keyboard Maestro and Stream Deck</title><link href="https://osomac.com/2022/04/27/global-mute-with-keyboard-maestro-and-stream-deck/" rel="alternate" type="text/html" title="Global Mute using Keyboard Maestro and Stream Deck" /><published>2022-04-27T00:00:00+00:00</published><updated>2022-04-27T00:00:00+00:00</updated><id>https://osomac.com/2022/04/27/global-mute-with-keyboard-maestro-and-stream-deck</id><content type="html" xml:base="https://osomac.com/2022/04/27/global-mute-with-keyboard-maestro-and-stream-deck/"><![CDATA[<p>Since the Work-from-Home trend started, video conferencing software has become prevalent. I often have to switch between different platforms since not everyone uses the same: usually, I am on the receiving side of an invitation. This switching makes it challenging to build muscle memory for the most crucial action during a video conference: muting and unmuting the microphone.</p>

<p>For some time, I have been using an external Bluetooth device (<a href="https://www.jabra.sg/business/speakerphones/jabra-speak-series/jabra-speak-710">Jabra Speak 710</a>), which has a dedicated mute button. This is convenient since I had the same control for all software platforms and a clear visual cue about the state of the microphone (Jabra shows a ring of red LED lights around the speaker if the microphone is muted). On the negative side, this adds friction since I have to remember to switch on the Jabra and to check that the conferencing platform is using the correct input/output channels. My webcam has a decent microphone, and my screen has excellent speakers (way better than Jabra’s). Also, I don’t have to remember to switch something on before the meeting, and I can simply join.</p>

<p>To get the same “universal mute” functionality that I had with Jabra, I decided to use <a href="https://www.keyboardmaestro.com/main/">Keyboard Maestro</a> and my <a href="https://www.elgato.com/en/stream-deck">Stream Deck</a><sup id="fnref:1" role="doc-noteref"><a href="#fn:1" class="footnote" rel="footnote">1</a></sup>. This solution gives me the same universal mute button, including the visual cue. I don’t have the visual indication if using my laptop away from my desk, but that happens rarely, and it’s not a significant inconvenience. This solution also allows me to instantly mute the microphone, independently from what I am doing.</p>

<p>Here is a brief explanation of how I set this up. The only required external component is Keyboard Maestro. It should be possible to use Shortcuts, but I used Keyboard Maestro because I wanted to control the entire workflow with one button on the Stream Deck.</p>

<h2 id="keyboard-maestro-macros">Keyboard Maestro Macros</h2>
<p>I use two macros:</p>
<ol>
  <li><code class="language-plaintext highlighter-rouge">Mic - Toggle Microphone</code><sup id="fnref:3" role="doc-noteref"><a href="#fn:3" class="footnote" rel="footnote">2</a></sup>: Toggles the microphone on and off;</li>
  <li><code class="language-plaintext highlighter-rouge">Mic - Update Stream Deck button</code>: Updates the Stream Deck button every minute—so the status is correct even if the volume is changed by other apps or using the system controls<sup id="fnref:2" role="doc-noteref"><a href="#fn:2" class="footnote" rel="footnote">3</a></sup>.</li>
</ol>

<p>If you don’t have a Stream Deck, you can just use the first macro. You need to delete the last step, which calls the other macro to update the Stream Deck button.</p>

<p>You can download the macros <a href="/assets/posts/2022-04-27-global-mute-with-keyboard-maestro-and-stream-deck/global-mute.kmmacros">here</a>.</p>

<p>For the Stream Deck icons, I have used <a href="https://developer.apple.com/sf-symbols/">SF Symbols</a> and the very good <a href="https://apps.apple.com/us/app/button-creator-for-stream-deck/id1559303865?mt=12">Button Creator</a> for Stream Deck on the Mac App Store.</p>

<p>I also use a keyboard shortcut to trigger the microphone, which is useful when using the laptop away from my desk<sup id="fnref:4" role="doc-noteref"><a href="#fn:4" class="footnote" rel="footnote">4</a></sup>.</p>

<h2 id="stream-deck-configuration">Stream Deck configuration</h2>
<p>On the Stream Deck, I use the official <a href="https://apps.elgato.com/plugins/com.stairways.keyboardmaestro">Keyboard Maestro Plugin</a> since I want to update the icon and the title of the button. The button I use is <code class="language-plaintext highlighter-rouge">R4C6</code> on the Stream Deck: I have assigned it a custom ID, so my macros would still work if I decide to use a different button. As shown in the screenshot below, the ID used in the macros is <code class="language-plaintext highlighter-rouge">MIC</code>.</p>

<p><img src="/assets/posts/2022-04-27-global-mute-with-keyboard-maestro-and-stream-deck/stream-deck.png" alt="" /></p>

<p>I hope you find this useful!</p>

<hr />

<div class="footnotes" role="doc-endnotes">
  <ol>
    <li id="fn:1" role="doc-endnote">
      <p>You can change the volume of your microphone very quickly in AppleScript, using <code class="language-plaintext highlighter-rouge">set volume input volume 75</code>; if you set the volume to 0 the microphone is muted. <a href="#fnref:1" class="reversefootnote" role="doc-backlink">&#8617;</a></p>
    </li>
    <li id="fn:3" role="doc-endnote">
      <p>I tend to prefix the names of my macros so related ones appear together in Keyboard Maestro. <a href="#fnref:3" class="reversefootnote" role="doc-backlink">&#8617;</a></p>
    </li>
    <li id="fn:2" role="doc-endnote">
      <p>Zoom does not allow the microphone volume to go to zero, but it goes low enough to behave correctly. For this reason, I consider the microphone muted if the volume is lower than 10. The current volume is shown on the Stream Deck. <a href="#fnref:2" class="reversefootnote" role="doc-backlink">&#8617;</a></p>
    </li>
    <li id="fn:4" role="doc-endnote">
      <p>For the same reason, the macro shows the current microphone status using system notifications. <a href="#fnref:4" class="reversefootnote" role="doc-backlink">&#8617;</a></p>
    </li>
  </ol>
</div>]]></content><author><name>Cesare Tagliaferri</name></author><category term="Tutorials" /><category term="automation" /><category term="keyboardmaestro" /><category term="streamdeck" /><category term="videoconferencing" /><category term="audio" /><summary type="html"><![CDATA[Since the Work-from-Home trend started, video conferencing software has become prevalent. I often have to switch between different platforms since not everyone uses the same: usually, I am on the receiving side of an invitation. This switching makes it challenging to build muscle memory for the most crucial action during a video conference: muting and unmuting the microphone.]]></summary><media:thumbnail xmlns:media="http://search.yahoo.com/mrss/" url="https://osomac.com/assets/img/osomac-image.jpg" /><media:content medium="image" url="https://osomac.com/assets/img/osomac-image.jpg" xmlns:media="http://search.yahoo.com/mrss/" /></entry><entry><title type="html">Coming Back</title><link href="https://osomac.com/2020/10/18/coming-back/" rel="alternate" type="text/html" title="Coming Back" /><published>2020-10-18T00:00:00+00:00</published><updated>2020-10-18T00:00:00+00:00</updated><id>https://osomac.com/2020/10/18/coming-back</id><content type="html" xml:base="https://osomac.com/2020/10/18/coming-back/"><![CDATA[<p>It’s been a (very) long while since I posted something here, and it’s not for lack of ideas. The reality is that time is always the most precious commodity, and, for some reason, other things always end up taking priority.</p>

<p>I will make another attempt to post more regularly, targeting a post every month. My interests have also shifted a bit during the past few years; you can expect posts on the following topics:</p>
<ul>
  <li>Productivity (I went back to <a href="https://www.omnigroup.com/omnifocus">OmniFocus</a>, in case you wonder);</li>
  <li>Privacy and Security;</li>
  <li>3D printing.</li>
</ul>]]></content><author><name>Cesare Tagliaferri</name></author><summary type="html"><![CDATA[It’s been a (very) long while since I posted something here, and it’s not for lack of ideas. The reality is that time is always the most precious commodity, and, for some reason, other things always end up taking priority.]]></summary><media:thumbnail xmlns:media="http://search.yahoo.com/mrss/" url="https://osomac.com/assets/img/osomac-image.jpg" /><media:content medium="image" url="https://osomac.com/assets/img/osomac-image.jpg" xmlns:media="http://search.yahoo.com/mrss/" /></entry><entry><title type="html">A personal rant on Security and Privacy</title><link href="https://osomac.com/2018/11/27/rant-on-security-and-privacy/" rel="alternate" type="text/html" title="A personal rant on Security and Privacy" /><published>2018-11-27T00:00:00+00:00</published><updated>2018-11-27T00:00:00+00:00</updated><id>https://osomac.com/2018/11/27/rant-on-security-and-privacy</id><content type="html" xml:base="https://osomac.com/2018/11/27/rant-on-security-and-privacy/"><![CDATA[<p>You may have noticed an increasing trend of news articles about breaches of privacy, confidential data being leaked, and abuse of privacy regulations. We are used to big companies being hacked, leaking private data, and their ineptitude in handling these privacy incidents. You probably remember the <a href="https://www.ftc.gov/equifax-data-breach" target="_blank">Equifax data breach</a> in 2017, or more recently, in Singapore, <a href="https://techcrunch.com/2018/07/20/singapore-hack-health/" target="_blank">SingHealth</a> (Singapore’s biggest network of healthcare facilities). The trend started with non-technology companies, but is spreading fast, and has begun to affect the <a href="https://www.investopedia.com/terms/f/faang-stocks.asp" target="_blank">FAANGs</a>: <a href="https://www.forbes.com/sites/thomasbrewster/2018/09/29/how-facebook-was-hacked-and-why-its-a-disaster-for-internet-security/" target="_blank">Facebook</a> (and its subsidiary <a href="https://thehackernews.com/2018/11/instagram-password-hack.html" target="_blank">Instagram</a>), <a href="https://techcrunch.com/2018/10/08/google-plus-hack/" target="_blank">Google</a>, <a href="https://www.theguardian.com/technology/2018/nov/21/amazon-hit-with-major-data-breach-days-before-black-friday?CMP=Share_AndroidApp_Copy_to_clipboard" target="_blank">Amazon</a>. Apple is still holding for the moment. This list only covers the most hyped cases of the past few weeks.</p>

<h4 id="we-are-the-problem">We are the problem…</h4>
<p>The main issue with privacy is rooted in our mindset: most people don’t have any understanding of the risks and implications of using connected tools and services. There are big powers at play, and the vast majority of users don’t even realize that they’re valuable targets. Whenever I talk on the importance of using strong passwords, different on each app and website, most people just roll their eyes.</p>

<p>Almost no one realizes that there has been a significant shift in the world of cyber-security. On one side you have what we see in the movies, where the smart hacker will bypass all defenses and firewalls of any government agency or military base, within seconds. And, on the other hand, you have the real world, where some lazy fraudsters will buy a script from a hacker and exploit tens of thousands of vulnerable devices around the world. Most people are only familiar with the first case and don’t realize that they are likely already victims of the second. Everyone is a target, as long as they have essential files, a computer (or any device with some computing power such as a router), a bank account, or a credit card.</p>

<p>When was the last time you updated your home router’s firmware? Do you know that <a href="https://www.shodan.io/" target="_blank">search engines</a> are continually indexing vulnerable devices? You could, for example, look for all Synology Disk Stations with a guest account enabled, all <a href="https://thehackernews.com/2018/10/router-hacking-exploit.html" target="_blank">vulnerable MicroTik routers</a>, all open or hackable webcams, just about anything. Do you think this is difficult to do in real life? In the video below, in less than a minute, I log into some random person’s Netgear router. From there I could very quickly jump into their home network, get their private files, intercept all the network traffic, install ransomware or crypto-mining software, even switch off their home’s Wi-Fi and lock them out of their own router. A small piece of advice: log into your router, switch off <a href="https://en.wikipedia.org/wiki/Universal_Plug_and_Play" target="_blank">UPnP</a> (Universal Plug and Play), change the password, and enable automatic firmware updates.</p>

<center>
  <img src="/assets/posts/router_hack.gif" alt="A quick snapshot of me getting into a router a million miles away" />
  <br />
  <em>A quick snapshot of me getting into a router a million miles away</em>
</center>
<p><br /></p>

<p>Just consider that a newly found <a href="https://en.wikipedia.org/wiki/Zero-day_(computing){:target=&quot;_blank&quot;}">zero-day vulnerability</a> can be worth millions on the black market, while it is only worth a fraction of that if it’s responsibly disclosed. A weakness on a consumer router won’t be used to hack into a foreign government, but it will be used to exploit as many unaware people as possible.</p>

<h4 id="and-also-the-solution">…and also the solution</h4>
<p>Our responsibility as technologists is to raise the level of awareness and start spreading safe privacy behaviors around us. If we do this in the workplace, our employees will then bring good habits home to their families and friends. At TSC, even though we are still considered a startup, we have mandatory periodic security training, monthly phishing tests, enforce the use of two-factor authentication, and provide all employees with a password manager not only for their work passwords but also for their private ones. We also offer a VPN for people who travel or like to work in public places. We have seen a massive transformation in the way our people behave in their everyday life, and at the same time, the attack surface of our company has shrunk considerably.</p>

<p>I, personally, have not used Google search in years, <a href="https://duckduckgo.com/" target="_blank">and find that DuckDuckGo</a> provides excellent search results without harvesting my data. I also use content blockers on all my browsers and devices, do not allow my email clients to download images or other remote resources, and route all my web traffic through a VPN. While it might seem extreme to some, these are the steps I chose to take to protect my personal data.</p>

<p>In reality, we trade our privacy for convenience every time we do a Google search. I encourage everyone to take an honest look at their own privacy posture and make informed choices about how much personal data they are willing to share with the world.</p>

<blockquote>
  <p>I have originally posted this article on <a href="https://tsc.ai">TSC</a>’s website, but I thought it would be relevant for OSOMac’s readers as well.</p>
</blockquote>]]></content><author><name>Cesare Tagliaferri</name></author><category term="Articles" /><category term="cybersecurity" /><category term="technology" /><category term="privacy" /><summary type="html"><![CDATA[You may have noticed an increasing trend of news articles about breaches of privacy, confidential data being leaked, and abuse of privacy regulations. We are used to big companies being hacked, leaking private data, and their ineptitude in handling these privacy incidents. You probably remember the Equifax data breach in 2017, or more recently, in Singapore, SingHealth (Singapore’s biggest network of healthcare facilities). The trend started with non-technology companies, but is spreading fast, and has begun to affect the FAANGs: Facebook (and its subsidiary Instagram), Google, Amazon. Apple is still holding for the moment. This list only covers the most hyped cases of the past few weeks.]]></summary><media:thumbnail xmlns:media="http://search.yahoo.com/mrss/" url="https://osomac.com/assets/img/osomac-image.jpg" /><media:content medium="image" url="https://osomac.com/assets/img/osomac-image.jpg" xmlns:media="http://search.yahoo.com/mrss/" /></entry><entry><title type="html">Why We Use Elixir</title><link href="https://osomac.com/2018/09/04/why-we-use-elixir/" rel="alternate" type="text/html" title="Why We Use Elixir" /><published>2018-09-04T00:00:00+00:00</published><updated>2018-09-04T00:00:00+00:00</updated><id>https://osomac.com/2018/09/04/why-we-use-elixir</id><content type="html" xml:base="https://osomac.com/2018/09/04/why-we-use-elixir/"><![CDATA[<p>As CTO at TSC, this is one of the questions I am asked most often: Why choose niche technologies such as <a href="https://elixir-lang.org/">Elixir</a> and <a href="https://phoenixframework.org/">Phoenix</a>, rather than using something more mainstream like Java, Ruby, or Python? The answer encompasses both the type of people I want on my team and the sheer advantages of the technology for TSC’s specific use cases.</p>

<blockquote>
  <p>I have originally posted this article on <a href="https://tsc.ai">TSC</a>’s website, but I thought it would be relevant for OSOMac’s readers as well.</p>
</blockquote>

<h3 id="i-want-to-work-with-people-who-love-technology-and-development">I want to work with people who love technology and development</h3>
<p>Before getting into the technical reasons which make Elixir a great choice, I want to address the very first concern everybody raises. Where do we find people with the right technical experience and skill when most developers haven’t even heard of this language? Indirectly, this is the first test in an interview: if somebody has not heard of some new technology, it might mean that development is just a job for them, and I do not want them on my team. Business is going well, so we are happy to invest the time to allow a new hire to learn something new, as long as we get passion and commitment in exchange. At TSC, we want things done correctly, and would rather have a deadline missed than accumulate technical debt.</p>

<p>I am proud to say that we have world-class Elixir developers on our team, and none of them had previously used the language in a professional context before joining our team. Now they interact with the creators of the language and contribute to Open Source projects. Not only that, but they have fun and enjoy what they are doing.</p>

<p>We plan to start hosting Elixir meetups at TSC soon, with the goal of helping to make this technology more mainstream.</p>

<h3 id="functional-programming-is-the-way-to-go">Functional Programming is the way to go</h3>
<p>Even though this programming paradigm is not taught enough in Computer Science schools—which seem to be unable to move on from Object-Oriented Languages such as Java—the added robustness and scalability are too important to be disregarded. What seduced me years ago was the concept of immutability: it is so simple, yet it solves most of the issues related to concurrency and multi-threaded applications. Welcome to a world where Mutexes, Semaphores, and blocking code are things of the past.</p>

<p>The functional style also leads to simpler and more reusable code. This means not ending up with the thousands–of–lines–long procedures of Imperative languages, or unreadable class structures typical of Object-Oriented languages (which technically are sub-types of Imperative Programming).</p>

<h3 id="elixir-has-rock-solid-foundations">Elixir has rock-solid foundations</h3>
<p>First, Elixir was created by the same people who created <a href="https://rubyonrails.org/">Ruby on Rails</a>. It maintains a lot of the cool concepts of Ruby while pushing towards a purely functional style. Secondly, Elixir is based on <a href="http://www.erlang.org/">Erlang</a>, which is arguably the most scalable and robust stack existing today. Erlang does not need introductions; it has been used in mission-critical applications for decades and shines for its massive scalability and robustness. Threads crash and hang, but this is part of the design of Erlang, which makes small bugs and software instabilities something that can be handled at runtime.</p>

<p>Elixir repaints Erlang with a modern syntactical structure, greatly improving readability and productivity. On top of Elixir, the Phoenix Framework incarnates the best concepts of modern frameworks, taking many ideas from Rails, without the dogmatism into which Rails seems to have fallen lately.</p>

<p>Last but not least, the tools available for Elixir &amp; Phoenix are impressive for such young technologies. This is incredibly helpful for increased productivity and is still very lean.</p>

<h3 id="conclusion">Conclusion</h3>
<p>In May 2017 we started a complete rewrite of TSC’s main product, Atium, which was previously written in PHP. Before year end, we had our first clients live on the new stack. Within the first half of 2018, all of our existing clients were migrated to the new product. We have not had any unplanned downtime since the system went live. Atium is a very complex system: the short time it took to our small team to build the platform, and the resilience of the end-product are proof of the dependability of the technology stack we have chosen. Stay tuned for future posts on our architecture and security design.</p>]]></content><author><name>Cesare Tagliaferri</name></author><category term="Articles" /><summary type="html"><![CDATA[As CTO at TSC, this is one of the questions I am asked most often: Why choose niche technologies such as Elixir and Phoenix, rather than using something more mainstream like Java, Ruby, or Python? The answer encompasses both the type of people I want on my team and the sheer advantages of the technology for TSC's specific use cases.]]></summary><media:thumbnail xmlns:media="http://search.yahoo.com/mrss/" url="https://osomac.com/assets/img/osomac-image.jpg" /><media:content medium="image" url="https://osomac.com/assets/img/osomac-image.jpg" xmlns:media="http://search.yahoo.com/mrss/" /></entry><entry><title type="html">New Website Online</title><link href="https://osomac.com/2018/06/09/new-website-online/" rel="alternate" type="text/html" title="New Website Online" /><published>2018-06-09T00:00:00+00:00</published><updated>2018-06-09T00:00:00+00:00</updated><id>https://osomac.com/2018/06/09/new-website-online</id><content type="html" xml:base="https://osomac.com/2018/06/09/new-website-online/"><![CDATA[<h2 id="the-new-osomac-is-online">The new OSOMac is online!</h2>

<p>As already said last week, I decided to migrate OSOMac to a new architecture. Over last weekend I had some time on my hands, and I started. The migration went smoothly, and as far as I can see, most things <em>should</em> work.</p>

<p>So, OSOMac is not running on <a href="https://wordpress.org">WordPress</a> anymore, and is now entirely static, hosted on <a href="https://aws.amazon.com/s3/">AWS S3</a>, and cached all over the world by <a href="https://aws.amazon.com/cloudfront/">AWS CloudFront</a>. Thanks to <a href="http://codeship.com">CodeShip</a> I only need to push an update to a specific GitHub repo, and the site is automatically deployed. There are plenty of posts on how to move from WordPress to <a href="https://jekyllrb.com">Jekyll</a>, but if you are interested in more details of my own experience, feel free to ask in the comments (which hopefully works with <a href="https://disqus.com">Disqus</a>), or use the <a href="/contact/">contact form</a>.</p>

<figure class="">
    <img src="https://osomac.com/assets/posts/jekyll.svg" alt="Jekyll" />
    
</figure>

<p>This new concept is by no means a completed work; I will retouch the design and hopefully write a bit more often.</p>

<p>All the old permalinks should work as usual, but I did not go through all the old posts and fix the various WordPress shortcodes, so some images are missing, and some text is poorly formatted. I doubt I will ever have the time to fix that. However, if you need something that you can’t find, <a href="/contact/">let me know</a>.</p>

<p>Oh, I have left a link to the descriptions of my old apps, but I will leave it to the reader to find it (and if you have old links they should still work). Also, all the download links for <a href="/apps/osx/handbrake-batch/">HandBrakeBatch</a> should still work, just much faster.</p>

<h2 id="atom-feed">Atom feed</h2>
<p>The <a href="https://en.wikipedia.org/wiki/Atom_(Web_standard)">Atom feed</a> for the website changes from <code class="language-plaintext highlighter-rouge">/feed/</code> to <code class="language-plaintext highlighter-rouge">/feed.xml</code>. This should be managed transparently by most RSS clients, if not, please change it manually.</p>]]></content><author><name>Cesare Tagliaferri</name></author><category term="Blog&apos;s Life" /><summary type="html"><![CDATA[As already said last week, I decided to migrate OSOMac to a new architecture. Over last weekend I had some time on my hands, and I started. The migration went smoothly, and as far as I can see, most things _should_ work.]]></summary><media:thumbnail xmlns:media="http://search.yahoo.com/mrss/" url="https://osomac.com/assets/img/osomac-image.jpg" /><media:content medium="image" url="https://osomac.com/assets/img/osomac-image.jpg" xmlns:media="http://search.yahoo.com/mrss/" /></entry><entry><title type="html">Future of OSOMac</title><link href="https://osomac.com/2018/06/03/future-of-osomac/" rel="alternate" type="text/html" title="Future of OSOMac" /><published>2018-06-03T00:00:00+00:00</published><updated>2018-06-03T00:00:00+00:00</updated><id>https://osomac.com/2018/06/03/future-of-osomac</id><content type="html" xml:base="https://osomac.com/2018/06/03/future-of-osomac/"><![CDATA[<p>I have not updated anything on this site in a very long while. Partly because I do not have the time to maintain my applications, partly because the misalignment between the site and my current situation creates a lot of friction. The last sentence might sound a bit unclear, here are the main points:</p>
<ul>
<li><strong>I do not like the design anymore</strong>: my taste has considerably changed since I had chosen the current theme, as the general design trends;</li>
<li><strong>The current structure does not reflect well the primary purpose of the site</strong>: this was supposed to be a platform to showcase my creations, but now I have the chance of coding for work;</li>
<li><strong>WordPress is an overkill for my needs</strong>;</li>
<li><strong>I fell in love with <a href="https://jekyllrb.com">Jekyll</a> and static websites</strong>:&nbsp;Jekyll is a work of art, and the speed and security of a static site are unattainable with any back-end.</li>
</ul>
<p>I already run two Jekyll websites, for the two companies of which I'm CTO:&nbsp; I know what is going on at any steps of the chain, without having to rely on any back-end code (that I did not write) to do some magic. On top of that, with a simple CI/CD setup, I can update the sites from my phone in minutes.</p>
<p>So, here is the plan:</p>
<ol>
<li>Prepare a new, plain and minimalistic design;</li>
<li>Migrate from&nbsp;WordPress (which I'm hosting on a <a href="https://www.digitalocean.com">DigitalOcean</a> droplet) to Jekyll;</li>
<li>Start writing again: not often, but whenever I have something to say.</li>
</ol>
<p>Timeframe? Days, maybe weeks, but not months.</p>]]></content><author><name>{&quot;display_name&quot;=&gt;&quot;Cesare Tagliaferri&quot;, &quot;login&quot;=&gt;&quot;taglia&quot;, &quot;email&quot;=&gt;&quot;taglia@mac.com&quot;, &quot;url&quot;=&gt;&quot;http://www.osomac.com&quot;}</name><email>taglia@mac.com</email></author><category term="Blog&apos;s Life" /><category term="migrated_from_wp" /><category term="blogging" /><summary type="html"><![CDATA[I have not updated anything on this site in a very long while. Partly because I do not have the time to maintain my applications, partly because the misalignment between the site and my current situation creates a lot of friction.]]></summary><media:thumbnail xmlns:media="http://search.yahoo.com/mrss/" url="https://osomac.com/assets/img/osomac-image.jpg" /><media:content medium="image" url="https://osomac.com/assets/img/osomac-image.jpg" xmlns:media="http://search.yahoo.com/mrss/" /></entry></feed>