The idea behind this post came to me from Twitter’s initiative, allowing users to set an NFT as profile picture (please note that, at the time of this writing, you need to subscribe to Twitter Blue for this). Unfortunately, I arrived into the NFT world late, and I do not own any of the blue-chip assets. At the same time, I like the idea of having my photo as profile picture. So, I decided to create an NFT collection and to mint my photo as an NFT. While at it, I will make a tutorial out of this.
Summary
While I will not go into too much detail, I will outline the entire process, from storing the images and metadata, to creating and deploying the collection smart contract, and everything in between. In particular, I will cover the storage of images and metadata more extensively, since I believe many of the NFT collections are weak on this side.
Here is a list of the topics I will cover:
- Storing information on IPFS;
- Installing a smart contract development environment (I will use Hardhat for this);
- Creating an NFT collection, following the ERC-721 standard, and using OpenZeppelin contracts;
- Deploying the collection to a testnet first, and to the mainnet after;
- Minting images and, finally, using them as a profile photo on Twitter.
Disclaimers
- In this post I will focus on the Ethereum blockchain only;
- The main objective here is to get through the entire process relatively quickly; you need some basic understanding of modern development to follow.
1. Storage
I am sure everyone has read something about NFTs (and web3 in general) not being truly decentralized: if not, I recommend you have a look at this famous blog post by Moxie Marlinspike.
One of the main points of concern is that NFTs does not include the content (an image, video, song, or anything), but only a URI pointing to it. The content can very well be stored on someone’s private server. This gives no guarantees that the content will be available in the future, or that it will not be changed.
IPFS
One solution is to use an immutable file storage, like IPFS. Unfortunately, most people don’t understand how IPFS works: while it guarantees that the content will not change, it does not guarantee that it will be online. I can run an IPFS node on my laptop and add files, but the moment my laptop goes offline, those files will not be available anymore. There are pinning services, which can maintain the content online on your behalf: the best known is Pinata, and offers free accounts. This is a better solution, but it does not guarantee that the content will be available indefinitely: Pinata’s users can decide to unpin content from their account at any moment. If they do, there is no guarantee that the content will be available.
We will use a different service, called NFT.Storage. The service is completely free, and leverages Filecoin to keep the content online. If you are curious about how they can keep content online for free, have a look at their FAQ.
2. Development Environment
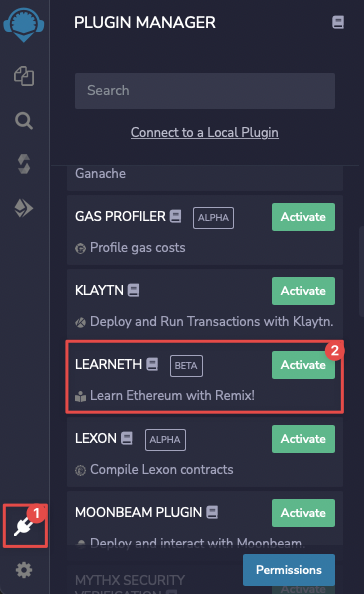
The development ecosystem for Ethereum smart contracts is quite rich today, both in terms of environments and languages. If you decide to stick with the main language, Solidity, the three main development tools are: Remix, the Truffle Suite, and Hardhat. If you are a beginner, I recommend you try out Remix: there is nothing to install—it runs in the browser—and it includes awesome tutorials (they will be available if you install the LEARNETH plugin, as shown in the screenshot below).
While remix would have been perfect for this task, I decided to use Hardhat. The main reason is that I’m a bit allergic to advanced IDEs and I prefer to do everything in the terminal, using tmux and vim.
To use Hardhat you need Node.js. I will not go through the details of installing it; I will use version 16.16.0 LTS, which I have installed using nvm:
nvm install 16.16
nvm use 16.16
At this point, you can follow the steps from the official Hardhat Guide to install Hardhat and create your project. We are also going to use the hardhat-etherscan plugin, so our smart contract will be verified on Etherscan.
3. Creating the Collection
On the blockchain, an NFT collection is just a Smart Contract. There are two standards suitable for this type of tokens: ERC-721 and ERC-1155. The latter covers advanced use cases, specifically for gaming, so I will use the classic ERC-721. Most of the blue-chip NFT collections are built following this standard as well.
Since this collection will represent me, and my usual name on social media is taglia, I have decided to call it “TagliaMyselves” and to use “TAGLIA” as symbol. Please change these values if you are following the tutorial.
We will start by installing Hardhat and initializing a project inside an empty folder:
mkdir taglia_myselves
cd taglia_myselves
npm install --save-dev hardhat
This will install Hardhat and all of its dependencies. At this point, we need to initialize the project, and we do this by simply running npx hardhat (which will prepare an appropriate folder structure). We will create a simple JavaScript project:
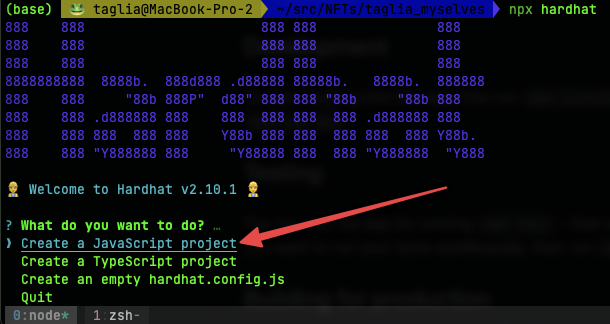 We will choose the defaults for all the other points.
Now, your directory should look like so:
README.md contracts hardhat.config.js node_modules package-lock.json package.json scripts test
We will focus on three key components:
hardhat.config.js: this is the configuration file, where we specify the Hardhat plugins that we will use, and the networks that we will use for deployment;- The smart contract itself, which we will generate using OpenZeppelin’s wizard, and which will be stored in the
contractsdirectory; - The deployment script,
scripts/deploy.js.
I have changed my configuration file, hardhat.config.js, like so:
require("@nomicfoundation/hardhat-toolbox");
require("@nomiclabs/hardhat-etherscan");

/** @type import('hardhat/config').HardhatUserConfig */
module.exports = {
  solidity: "0.8.9",
  paths: {                         // add this
    artifacts: './src/artifacts',  // this is where our compiled contracts will go
  },
  networks: {
    hardhat: {
      chainId: 1337,
    },
    mainnet: {
      url: "YOUR INFURA MAINNET ENDPOINT",
      accounts: [
        "YOUR WALLET PRIVATE KEY"
      ],
    },
    ropsten: {
      url: "YOUR INFURA ROPSTEN ENDPOINT",
      accounts: [
        "YOUR WALLET PRIVATE KEY"
      ],
    },
  },
  etherscan: {
    apiKey: "YOUR_ETHERSCAN_API_KEY"
  },
};
A couple of things to note:
- I have added the
hardhat-ehterscanplugin: this allows me to verify the smart contract very simply. A verified smart contract has a green checkmark on Etherscan, and its source code is visible by everyone; this plugin needs to be installed, by issuing this command:npm install --save-dev @nomiclabs/hardhat-etherscan. - I have added the Etherscan API key, so the plugin can work (you need to create an account on Etherscan, and copy your API key for this to work).
- I have added three networks:
hardhat: this is a development network, created by Hardhat itself, and running locally;ropsten: a public testnet1. You have to add your wallet’s private key here (more on this later);mainnet: the main Ethereum blockchain.
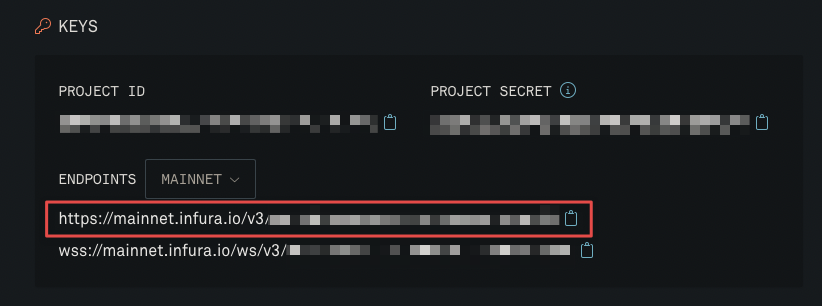
- I am not running a full Ethereum node on my laptop, for simplicity I decided to use Infura for this. All you need to do is to create a free account on Infura, create a project of type
Ethereum, copy the endpoints for Ropsten and Mainnet, and paste them into your configuration file.
3.1 Creating the Smart Contract
Solidity development is not in the scope of this tutorial, so for this exercise we will use OpenZeppelin’s Wizard. This is the way I have configured my contract:
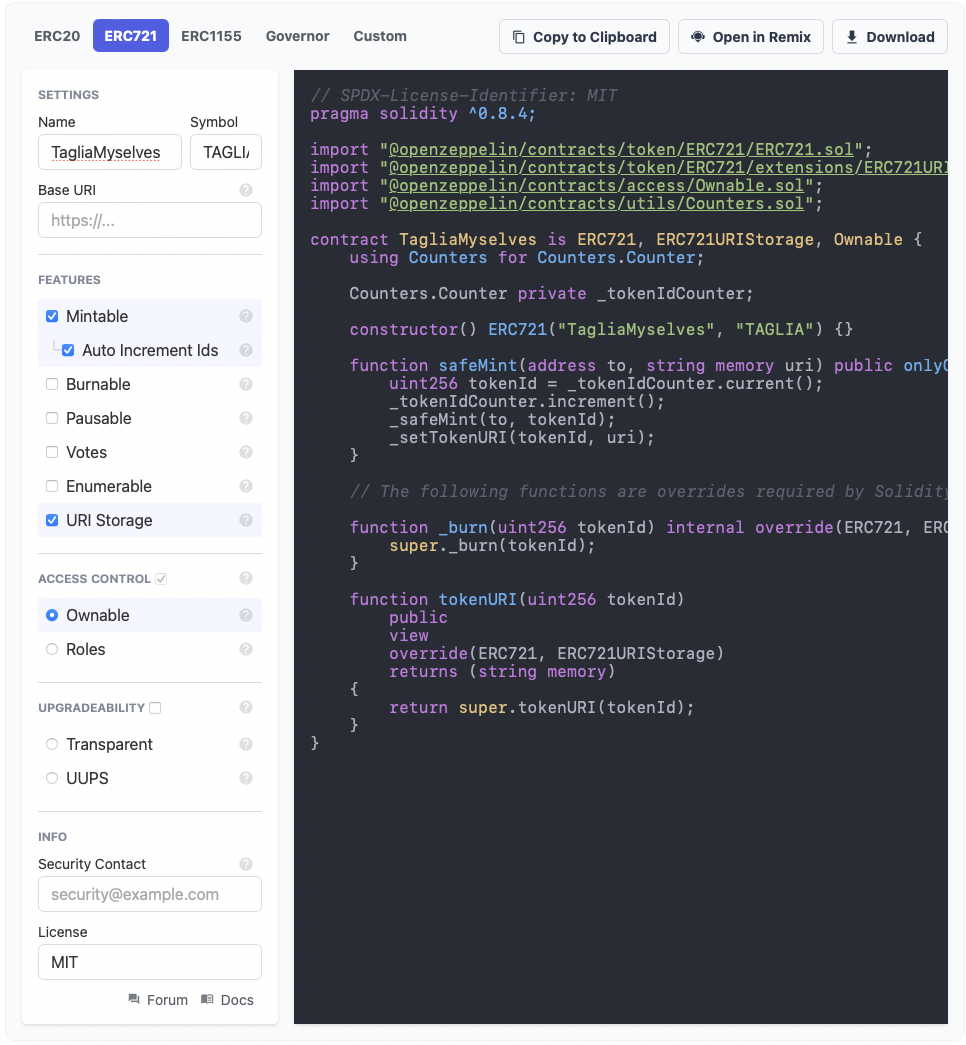
Let’s go through the configuration step by step:
- Contract Type: As you can see from the selected tab, at the top, I have chosen ERC-721, as discussed earlier in this post;
- Settings:
- Name and Symbol are quite obvious;
- Base URI is essential, and I will go a bit deeper. In an NFT collection, each token has a URI which points to its metadata (the location of the image is specified inside the metadata); this token URI is built by concatenating the base URI with the token ID. So, assuming we are minting token 19, its token URI will simply be the collection’s base URI with “19” appended. This is usually done by creating a directory, and storing the metadata JSON file for each token inside it, appropriately named. Since IPFS is an immutable file system, the Content ID (CID) of a directory will change every time its content changes. So, this approach is only valid if we can create all the NFT images and metadata before we create the smart contract. If we upload everything at the same time, we will get a single CID for the directory containing the metadata. I want to be able to add new images at any time, so I can’t use this approach. One could argue that I could get a constant directory URI by using IPNS, but in that case, I must forego immutability. I will always be able to change the content of existing tokens in the future, and this goes against the concept of NFT in my opinion. By leaving the base URI empty, we will be able to set a different URI for each token.
- Features:
- Mintable: I want to be able to mint new tokens whenever I intend to use a different photo, and I would rather avoid manually assigning a token ID every time.
- Enumerable: This increases the gas cost, and is useful if you are creating a collection that you wish to trade. I have not enabled this, since this collection is for my personal use only.
- URI Storage: This is required, since we are not using the Base URI option. We will be able to set a specific URI for every token, when it is minted.
- Other features: I invite you to read more about the various features.
- Access Control: I have chosen the simple model, Ownable, since I am the only one interacting with the contract and I do not need roles.
- Upgradeability: I don’t need the ability to upgrade the contract in the future.
- Info: This section is quite self-explanatory.
Note: the wizard does not include a way to limit the number of minted tokens. I don’t need that, but if you do, you need to modify the safeMint function to take that into account.
As you can see, the smart contract is simple, and we can use it straight away. Please customize the various elements to your liking ([email protected], CollectionContractName, YOUR_TOKEN_NAME, YOUR_TOKEN_SYMBOL).
// SPDX-License-Identifier: MIT
pragma solidity ^0.8.9;

import "@openzeppelin/contracts/token/ERC721/ERC721.sol";
import "@openzeppelin/contracts/token/ERC721/extensions/ERC721URIStorage.sol";
import "@openzeppelin/contracts/access/Ownable.sol";
import "@openzeppelin/contracts/utils/Counters.sol";

/// @custom:security-contact [email protected]
contract CollectionContractName is ERC721, ERC721URIStorage, Ownable {
    using Counters for Counters.Counter;

    Counters.Counter private _tokenIdCounter;

    constructor() ERC721("YOUR_TOKEN_NAME", "YOUR_TOKEN_SYMBOL") {}

    function safeMint(address to, string memory uri) public onlyOwner {
        uint256 tokenId = _tokenIdCounter.current();
        _tokenIdCounter.increment();
        _safeMint(to, tokenId);
        _setTokenURI(tokenId, uri);
    }

    // The following functions are overrides required by Solidity.

    function _burn(uint256 tokenId) internal override(ERC721, ERC721URIStorage) {
        super._burn(tokenId);
    }

    function tokenURI(uint256 tokenId)
        public
        view
        override(ERC721, ERC721URIStorage)
        returns (string memory)
    {
        return super.tokenURI(tokenId);
    }
}
I have stored this code in a new contract file, called contracts/TagliaMyselves.sol. You should name this file according to your contract name.
Of course, we need to install the OpenZeppelin contracts in our project, like so:
npm install @openzeppelin/contracts
Note: You might have to update the pragma solidity like in your smart contract, if that is different from the version you have installed. In my case, the wizard generated it with ^0.8.4, and I changed it to ^0.8.9. You can check which version hardhat installed by looking at the demo contract that it created (contracts/Lock.sol).
3.2 Creating the deployment scripts
Although I want to store this contract on my hardware wallet, for simplicity I will deploy it using a software wallet, and transfer the ownership later. This is the deployment script, please customize the contract and file names according to how you named your smart contract.
scripts/deploy.js
const hre = require("hardhat");

async function main() {
  const TagliaMyselves = await hre.ethers.getContractFactory("TagliaMyselves");
  const taglia_myselves = await TagliaMyselves.deploy();

  await taglia_myselves.deployed();

  console.log("TagliaMyselves deployed at:", taglia_myselves.address);
}

// We recommend this pattern to be able to use async/await everywhere
// and properly handle errors.
main().catch((error) => {
  console.error(error);
  process.exitCode = 1;
});
Please update these files using the contract name and file name that you used above.
4. Deployment
We will do a quick test, deploying locally, followed by deploying on the testnet, and finally on mainnet.
4.1 Local deployment
To deploy locally, we need to start a node which will simulate a full Ethereum node. Hardhat makes this simple, you just have to run this command:
npx hardhat node
This will create 20 accounts, with 10,000 ETH each. The output of the command is clear, but please NEVER use those private keys on anything which is not running locally. At this point, we can deploy with this command (you need to use another terminal window or tab; I use tmux which makes all this effortless):
npx hardhat run scripts/deploy.js --network hardhat

> TagliaMyselves deployed at: 0x5FbDB2315678afecb367f032d93F642f64180aa3
The deployment should be successful. If it is, you will see the contract address. If you like, you can interact with your contract by using the console: npx hardhat console. Kindly note that not everything will work on this simulated node.
4.2 Ropsten
As next step, we will deploy onto the Ropsten testnet, and try the safeMint function. There are a couple of steps here that I did not mention earlier. I will use Metamask: once you have installed the extension in your browser and configured it, you need to switch to the Ropsten network. You can follow this video to do that:
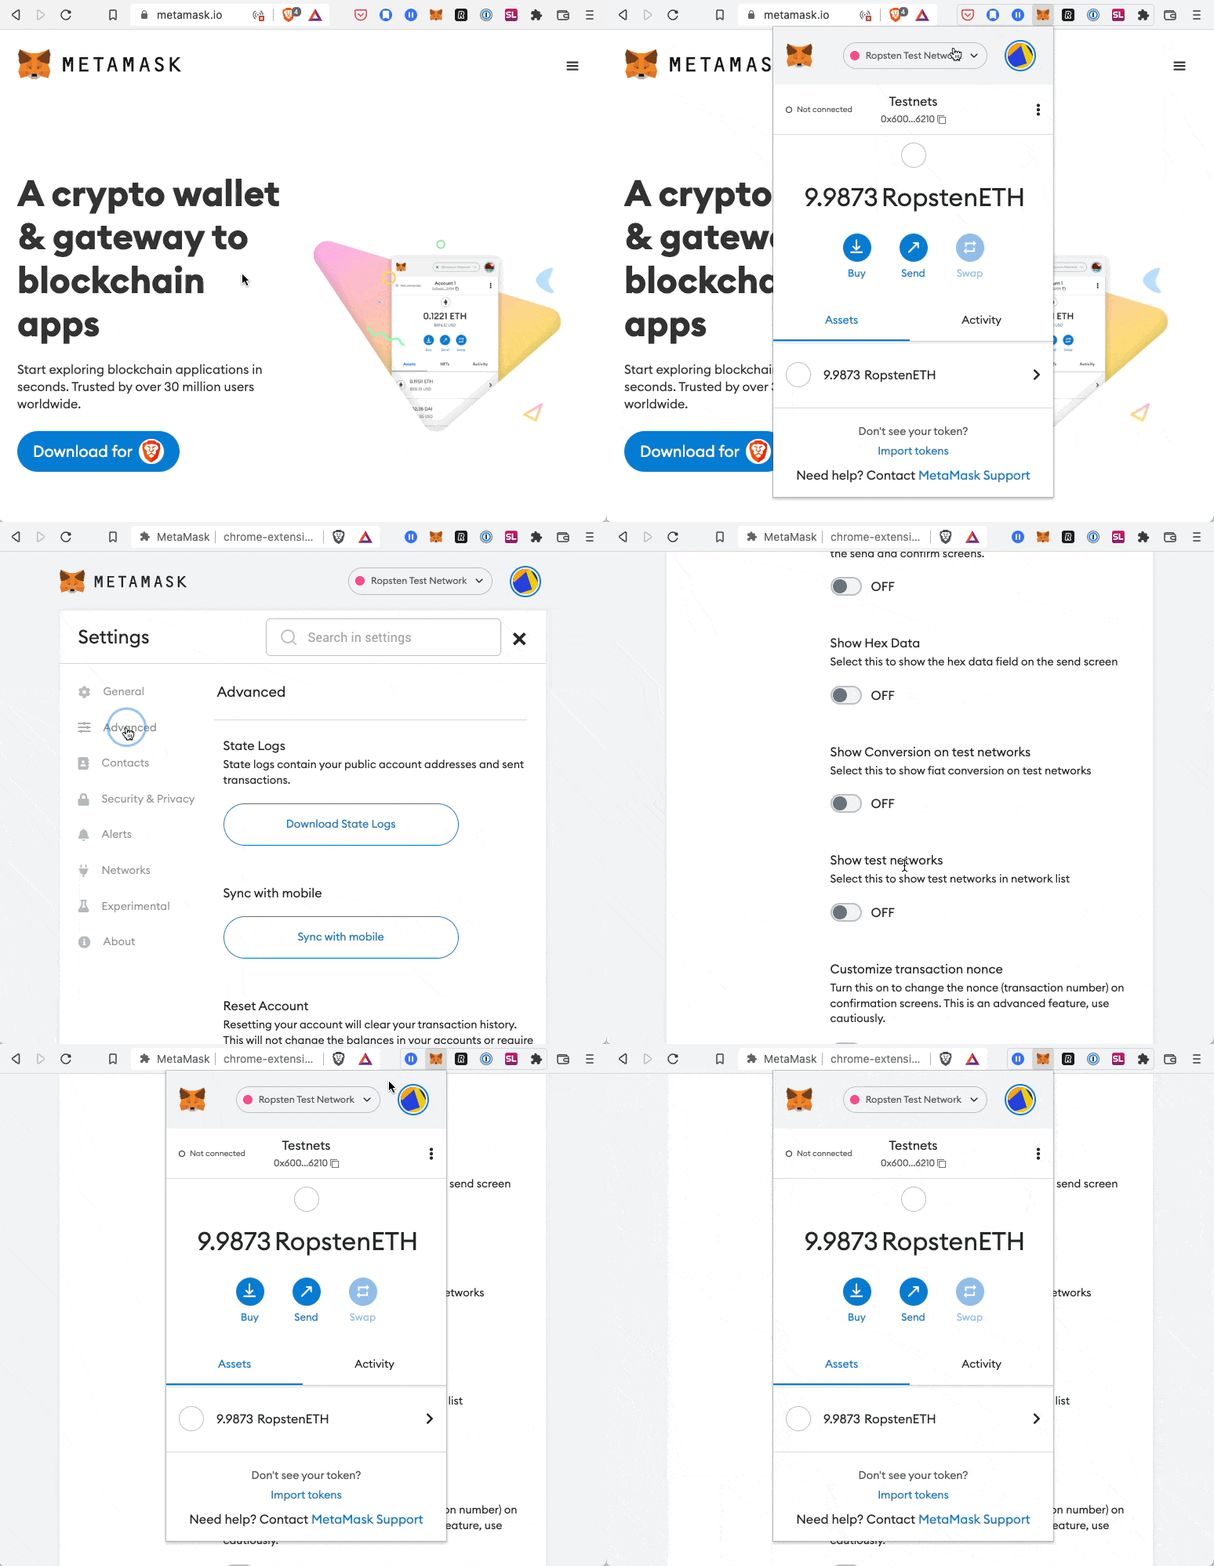
Your wallet will initially be empty; you can get some ETH using a faucet. You can just search for “ropsten faucet” and pick one of the results; the last one I used is Ropsten testnet faucet, and I believe it sends you 1 ETH every day.
To deploy a smart contract, you need to sign a transaction, and for that you must use your account’s private key. You should add the key to your hardhat.config.js file, in the Ropsten section, under accounts. Please see above in this post, where I have added the content of the file. In Metamask, you can get your private key by clicking on the three vertical dots next to your account name, and selecting “Account details”. Please be very prudent when handling private keys, and never share them if you are dealing with the mainnet.
Now, to deploy, you need to use this command:
npx hardhat run scripts/deploy.js --network ropsten

> TagliaMyselves deployed at: 0xfB4268c4Bc79eCF5567581f6b0Eaf918dc018c95
This will contact Infura and deploy your contract on the Ropsten network. If you go to Etherscan on Ropsten and enter your contract address, you will already see it. The contract is not verified, though, which makes interacting with it more difficult. Hardhat simplifies the contract verification. If you followed the tutorial from the beginning, you should have your Etherscan API key in the Hardhat configuration file, and you should have installed the appropriate plugin. You can verify the contract with just one command:
npx hardhat verify --network ropsten 0xfB4268c4Bc79eCF5567581f6b0Eaf918dc018c95 # <- Replace this with the address of your contract

> Nothing to compile
> Successfully submitted source code for contract
> contracts/TagliaMyselves.sol:TagliaMyselves at 0xfB4268c4Bc79eCF5567581f6b0Eaf918dc018c95
> for verification on the block explorer. Waiting for verification result...

> Successfully verified contract TagliaMyselves on Etherscan.
> https://ropsten.etherscan.io/address/0xfB4268c4Bc79eCF5567581f6b0Eaf918dc018c95#code
Of course, you need to use your smart contract address, which you got when you deployed. If you reload your contract page on Etherscan now, you will see the source code (in the Contract tab), and you will be able to interact with it. This is very convenient, and spares me from having to write an app to interact with the contract. Let’s try to mint our first test token:
- On Etherscan, click on the “Contract” tab (which now has a green checkmark, since the contract is verified);
- Go to the “Write Contract” section;
- Click on the “Connect to Web3” button, and connect it to your Metamask;
- Expand the “safeMint” function, add your wallet address as the
toargument, and whatever you want asuri(we will use something sensible on mainnet, no need to worry for now); - Click on “Write”.
At this point, Metamask will ask you to approve the transaction. This is a regular transaction, and it writes data to the blockchain; as such, it requires gas. If you followed the instructions earlier, and got some ETH from the faucet, everything should work once you approve the transaction in Metamask. This is the first token minted, so it has ID 0 (zero). If you go to the “Read Contract” section, on Etherscan, you can verify that token 0 has the URI that you set (use the tokenURI function, and set tokenId to 0). You can mint other tokens and play around with the contract.
We are finally ready to deploy to mainnet!
4.3 Mainnet
The process of deploying on mainnet is the same as it was on testnet; we just indicate the correct network.
npx hardhat run scripts/deploy.js --network mainnet
Again, after deploying the contract, we will verify it as we did earlier on Ropsten.
There is just one missing component before I can finally mint my photo: the metadata.
5. Metadata
NFT metadata are stored in a JSON file, and the URI of a token will point to this file. The file has some standard properties that all marketplaces and other actors (Metamask, Twitter, etc.) can read. I will just use some basic properties, since I do not intend to trade these tokens, and I do not care about anyone calculating the rarity, or showing each token’s traits.
This is the metadata I will attach to my first token:
{
  "name": "Cesare Tagliaferri",
  "description": "Portrait photo",
  "image": "ipfs://bafkreihxigpbhmaxkmsyxkssfxhsrod5dqaspj7ma6nmwmp2ycvlsam2gm"
}
The ipfs:// URI corresponding to the image key, is what I got from nft.storage when I uploaded my photo. I used their application, called “NFT UP”, which is super simple to use.
Once I have saved the JSON object into a file, I can upload it to IPFS too, using NFT Storage again.
6. Minting a token with my photo and using it on Twitter
Now we have all the components ready. We just need to mint one token on mainnet, using the IPFS URI pointing to the metadata. Once this is done, you will immediately see your token using the mobile version of Metamask, or if you log into any marketplace with the wallet where you stored the minted token. Every service uses some APIs to read the token’s metadata, so you will have to wait for a while before you see your image on a marketplace, or before Twitter accepts it as profile photo.
Conclusion
While not planned, this ended up being a very long post! I hope it will help someone else, definitely I learned a lot while writing it. And now, let me show off my Twitter profile.
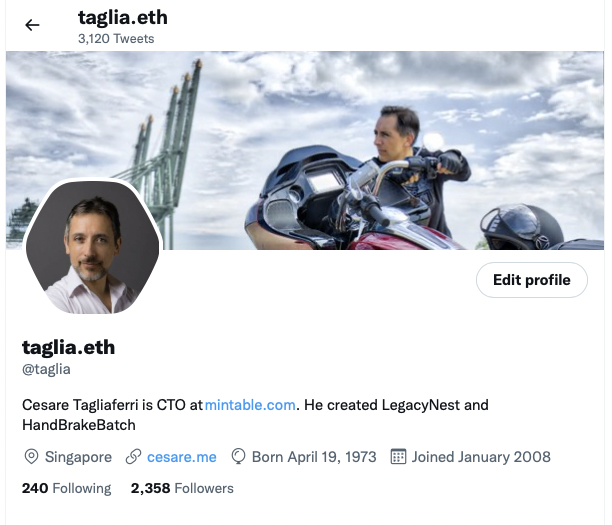
-
It is worth noting that Ropsten will be shut down soon: unfortunately, I have seen this when I was almost done with this, but you can follow the same steps using one of the other testnets. ↩