Since the Work-from-Home trend started, video conferencing software has become prevalent. I often have to switch between different platforms since not everyone uses the same: usually, I am on the receiving side of an invitation. This switching makes it challenging to build muscle memory for the most crucial action during a video conference: muting and unmuting the microphone.
For some time, I have been using an external Bluetooth device (Jabra Speak 710), which has a dedicated mute button. This is convenient since I had the same control for all software platforms and a clear visual cue about the state of the microphone (Jabra shows a ring of red LED lights around the speaker if the microphone is muted). On the negative side, this adds friction since I have to remember to switch on the Jabra and to check that the conferencing platform is using the correct input/output channels. My webcam has a decent microphone, and my screen has excellent speakers (way better than Jabra’s). Also, I don’t have to remember to switch something on before the meeting, and I can simply join.
To get the same “universal mute” functionality that I had with Jabra, I decided to use Keyboard Maestro and my Stream Deck1. This solution gives me the same universal mute button, including the visual cue. I don’t have the visual indication if using my laptop away from my desk, but that happens rarely, and it’s not a significant inconvenience. This solution also allows me to instantly mute the microphone, independently from what I am doing.
Here is a brief explanation of how I set this up. The only required external component is Keyboard Maestro. It should be possible to use Shortcuts, but I used Keyboard Maestro because I wanted to control the entire workflow with one button on the Stream Deck.
Keyboard Maestro Macros
I use two macros:
Mic - Toggle Microphone2: Toggles the microphone on and off;Mic - Update Stream Deck button: Updates the Stream Deck button every minute—so the status is correct even if the volume is changed by other apps or using the system controls3.
If you don’t have a Stream Deck, you can just use the first macro. You need to delete the last step, which calls the other macro to update the Stream Deck button.
You can download the macros here.
For the Stream Deck icons, I have used SF Symbols and the very good Button Creator for Stream Deck on the Mac App Store.
I also use a keyboard shortcut to trigger the microphone, which is useful when using the laptop away from my desk4.
Stream Deck configuration
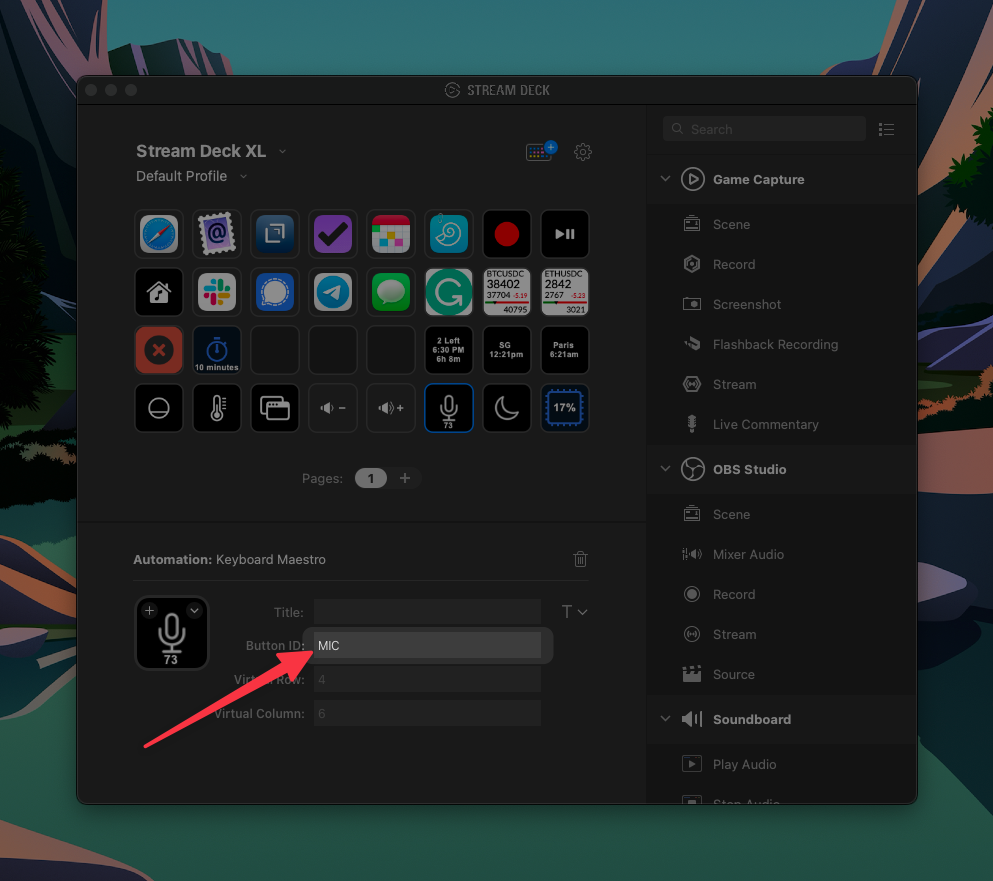
On the Stream Deck, I use the official Keyboard Maestro Plugin since I want to update the icon and the title of the button. The button I use is R4C6 on the Stream Deck: I have assigned it a custom ID, so my macros would still work if I decide to use a different button. As shown in the screenshot below, the ID used in the macros is MIC.
I hope you find this useful!
-
You can change the volume of your microphone very quickly in AppleScript, using
set volume input volume 75; if you set the volume to 0 the microphone is muted. ↩ -
I tend to prefix the names of my macros so related ones appear together in Keyboard Maestro. ↩
-
Zoom does not allow the microphone volume to go to zero, but it goes low enough to behave correctly. For this reason, I consider the microphone muted if the volume is lower than 10. The current volume is shown on the Stream Deck. ↩
-
For the same reason, the macro shows the current microphone status using system notifications. ↩